Lighting design best practices separate projects that work from those that waste money and frustrate users. Poor lighting choices lead to glare, high energy bills, and maintenance headaches that compound over time.
At OpenLumen, we’ve seen how the right approach transforms spaces-and how the wrong one derails them. This guide covers the foundational principles, common pitfalls, and practical tools that deliver results.
What Illuminance and Color Temperature Mean for Your Project
Illuminance levels and color temperature form the foundation of every lighting decision, yet most projects treat them as afterthoughts. Wrong choices waste energy, frustrate occupants, and create liability. The U.S. Department of Energy reports that widespread LED adoption has saved billions in energy costs, but those savings only materialize when designs match actual task requirements.
Specify Illuminance Based on Task Requirements
Start by identifying what people actually do in each space. Office work demands 300–500 lux for general tasks and 750 lux for detailed work like drafting or inspection. Retail product displays need 500–750 lux to make merchandise visible and appealing. Warehouses require 150–300 lux for safe navigation and material handling, though loading zones push toward 500 lux.
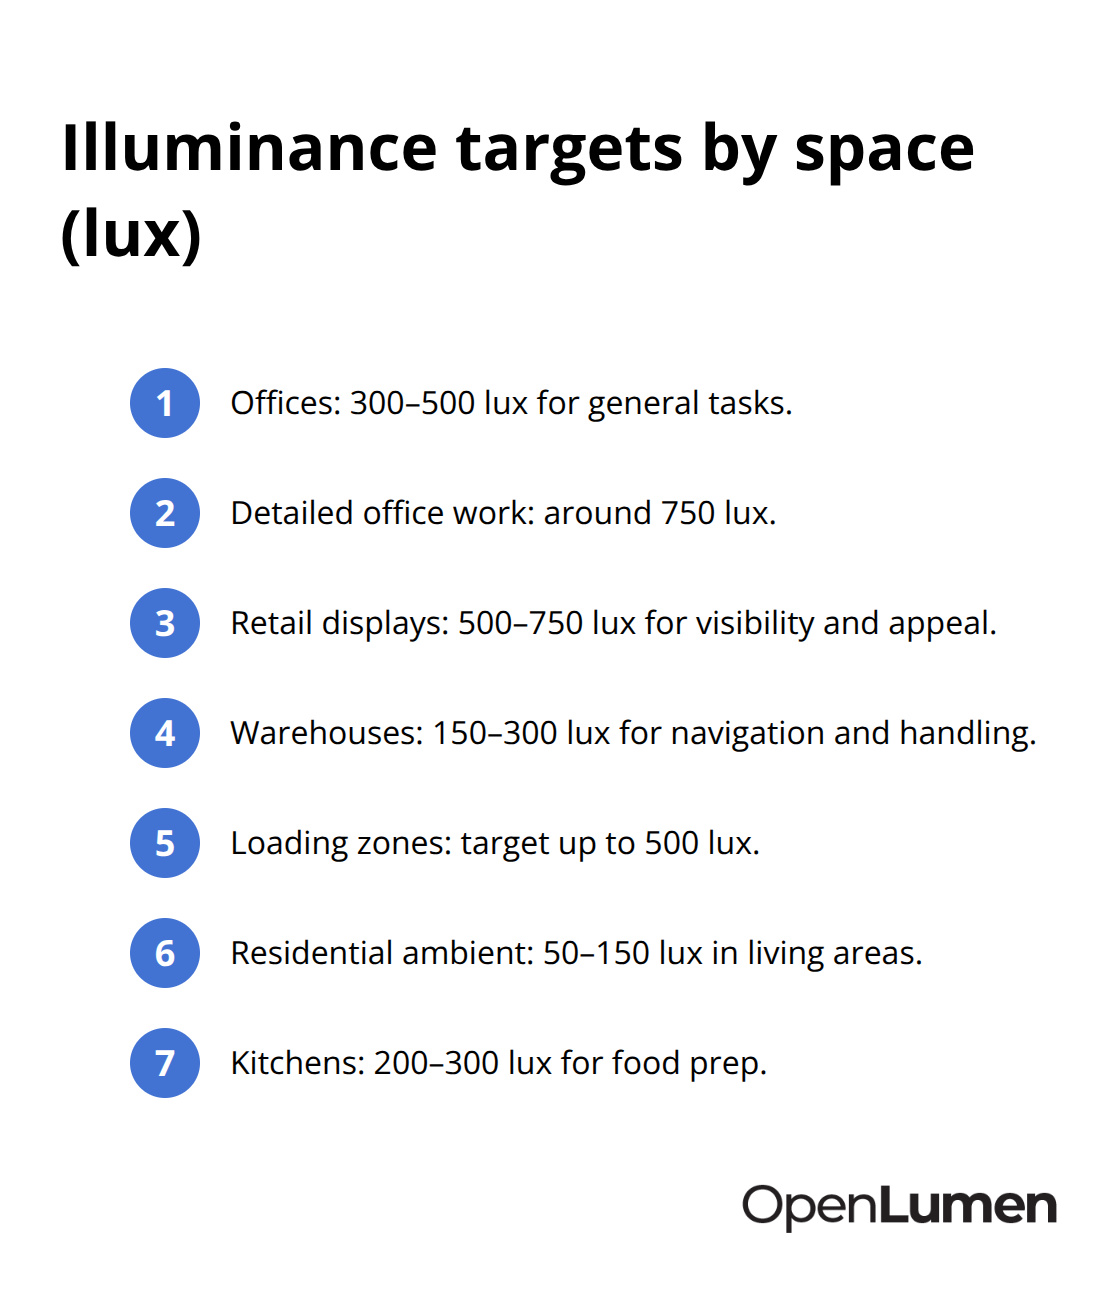
Residential spaces operate much lower-50–150 lux for ambient living areas, 200–300 lux for kitchens where food prep happens.
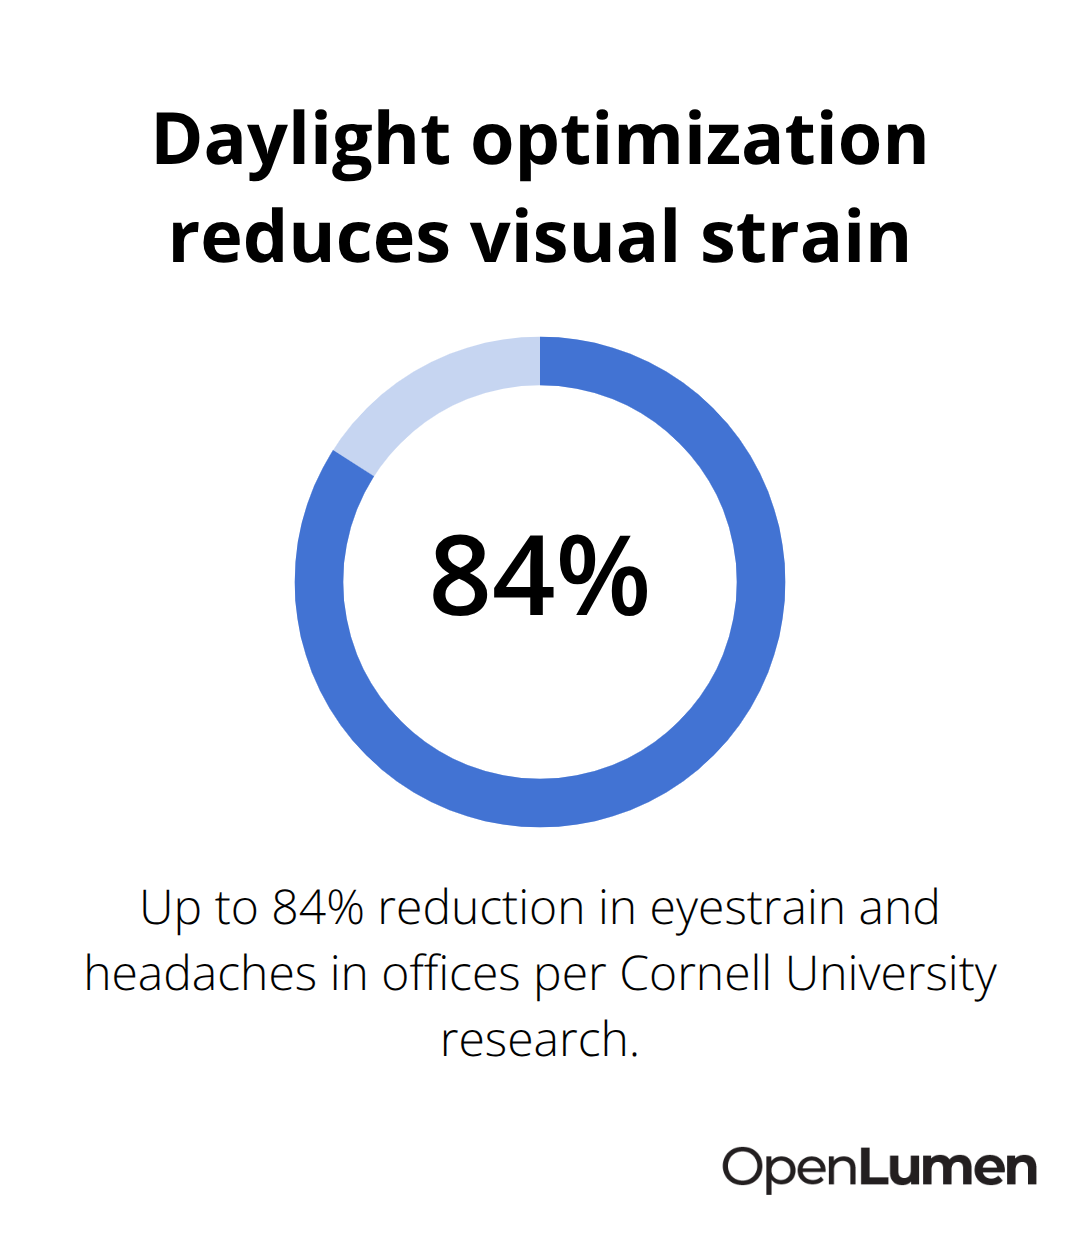
Most designers over-light spaces. Excessive illuminance wastes 20–40% of energy and triggers glare, eyestrain, and headaches. Research from Alan Hedge at Cornell University found that optimized daylight in offices reduces eyestrain, blurred vision, and headaches by up to 84%. This reveals a critical truth: more light does not equal better design. Precision does. Specify illuminance based on actual tasks, then validate with photometric calculations before installation.
Match Color Temperature to Activity and Mood
Color temperature shapes how people feel and perform in a space. Warm white light at 2700–3000K creates cozy, relaxed environments ideal for residential living rooms, bedrooms, and hospitality settings. Neutral white at 3500–4000K works across offices, retail, and kitchens where both task visibility and comfort matter equally. Cool white above 4700K mimics daylight and boosts alertness, making it suitable for hospitals, security areas, and detailed manufacturing work.
The trap is choosing one color temperature for an entire building. Modern LED systems offer tunable options that shift from 2700K in evening hours to 4000K during daytime work, supporting circadian rhythm alignment without complex rewiring. This human-centric lighting approach is gaining traction because it measurably improves sleep quality, mood, and productivity. For commercial spaces, stick with 4000K unless the task or brand identity demands otherwise-it delivers clarity without the cold sterility of 5000K or higher. For residential and hospitality, warm white feels intentional and inviting.
Layer Light to Control Brightness and Visual Comfort
Never rely on a single overhead fixture to deliver your target illuminance and color temperature. Layering light-combining ambient, task, and accent sources-gives you the control to meet requirements while maintaining visual comfort and design appeal. Ambient lighting provides general illumination across the entire space and comes from recessed fixtures, wall-mounted units, or indirect sources. Task lighting targets specific activities like reading, cooking, or precision work with focused beams 2–3 times brighter than ambient. Accent lighting highlights architectural features or artworks, adding depth and visual interest.
A well-lit kitchen, for example, needs recessed ambient lights for overall visibility, pendant lights over the island for task work, and perhaps under-cabinet strips for additional task support. This layered approach reduces glare by distributing brightness across multiple sources rather than concentrating it in one harsh overhead fixture. It also gives occupants control-they can brighten for work or dim for relaxation without redesigning the space. When you layer light effectively, you create spaces that adapt to how people actually work and live.
The next step is recognizing where most projects fail-and how to sidestep those pitfalls before they cost you time and money.
Common Lighting Design Mistakes and How to Avoid Them
Control Glare Before Installation
Glare destroys comfort faster than any other lighting mistake, yet most designers catch it too late-after installation. Direct glare occurs when bright fixtures sit in the occupant’s line of sight, triggering squinting and headaches. Reflective glare bounces off shiny surfaces like polished floors, glass partitions, or glossy paint, creating unpredictable bright spots that shift with viewing angle. The fix starts during specification, not after.
Choose fixtures with appropriate beam angles and shielding for each space. In offices where people work at desks, recessed lights with baffles or diffusers prevent direct view of the lamp. In retail environments, use asymmetrical beam patterns that push light onto merchandise rather than into customer eyes. Test your layout with photometric analysis before ordering fixtures-this catches glare problems that sketches and intuition miss.
Alan Hedge’s research at Cornell University found that optimized daylight reduces eyestrain and headaches by up to 84%, proving that comfort-focused design pays measurable returns. The second trap is specifying fixtures without considering the surrounding surfaces. Matte finishes on walls, ceilings, and floors scatter light diffusely and reduce reflective glare.
Shiny surfaces concentrate light and create hot spots. If your client insists on polished concrete or glass partitions, adjust your fixture selection and layout to compensate-lower wattage, wider distribution, or indirect lighting paths.
Match Fixture Selection to Surface Finishes
Upfront thinking about surfaces prevents the expensive retrofit conversations that happen six months after occupancy. Most designers treat fixture selection and surface finishes as separate decisions, but they work together. A high-output fixture paired with reflective surfaces creates glare; the same fixture with matte finishes distributes light evenly. Specify both simultaneously to achieve your target illuminance without visual discomfort.
Eliminate Energy Waste Through Precision
Energy efficiency gets ignored because the cost difference feels trivial at purchase. A 60-watt incandescent costs roughly $4.80 annually to operate at 2 hours per day, while a 12-watt LED replacement costs $1.00 per year-a $3.80 difference that seems negligible. Scale that across a 50-fixture office and you save $190 annually. Over 10 years, that’s $1,900 plus avoided replacement labor.
The real damage happens when designers over-specify illuminance to compensate for poor layering or glare control. Excessive light wastes 20–40% of energy immediately. Specify illuminance precisely to task requirements, then validate with photometric calculations. LEDs last up to 25 times longer than incandescent lamps, meaning fewer maintenance visits and lower replacement costs.
However, many projects still pair LEDs with outdated control systems that run at full brightness 24/7. Install occupancy sensors for spaces with variable use and daylight-responsive photosensors in perimeter zones where natural light fluctuates throughout the day. These controls typically cost $50–150 per zone and pay for themselves in 2–3 years through energy savings.
Plan Maintenance Before Problems Emerge
The third mistake compounds the first two: ignoring long-term maintenance costs. Cheap fixtures with poor optics collect dust faster, yellowing over time and reducing light output by 15–25%. Quality fixtures with sealed optics maintain brightness longer and cost less to maintain. Plan a cleaning schedule-dust buildup on recessed fixtures happens every 6–12 months in offices and faster in dusty environments like warehouses.
LEDs eliminate the frequent lamp replacement cycles of older technologies, but warranties vary widely. Specify fixtures with 5-year warranties and documented lumen maintenance curves so you know expected performance at years 3, 5, and 10. Create a maintenance log at handover, documenting fixture types, replacement dates, and cleaning intervals. This discipline prevents the slow dimming that frustrates occupants and triggers expensive emergency retrofits.
Once you sidestep these pitfalls, the next challenge becomes selecting the right tools to validate your decisions and communicate them to stakeholders.
Validating Designs Before Installation Saves Time and Money
Photometric analysis transforms lighting design from guesswork into precision. Most projects skip this step, assuming experience and rules of thumb suffice-then problems surface after fixtures arrive and installation crews are on-site. Running calculations before ordering luminaires identifies glare, dark spots, and over-lit zones that sketches and intuition miss entirely.
Map Illuminance Across Your Space
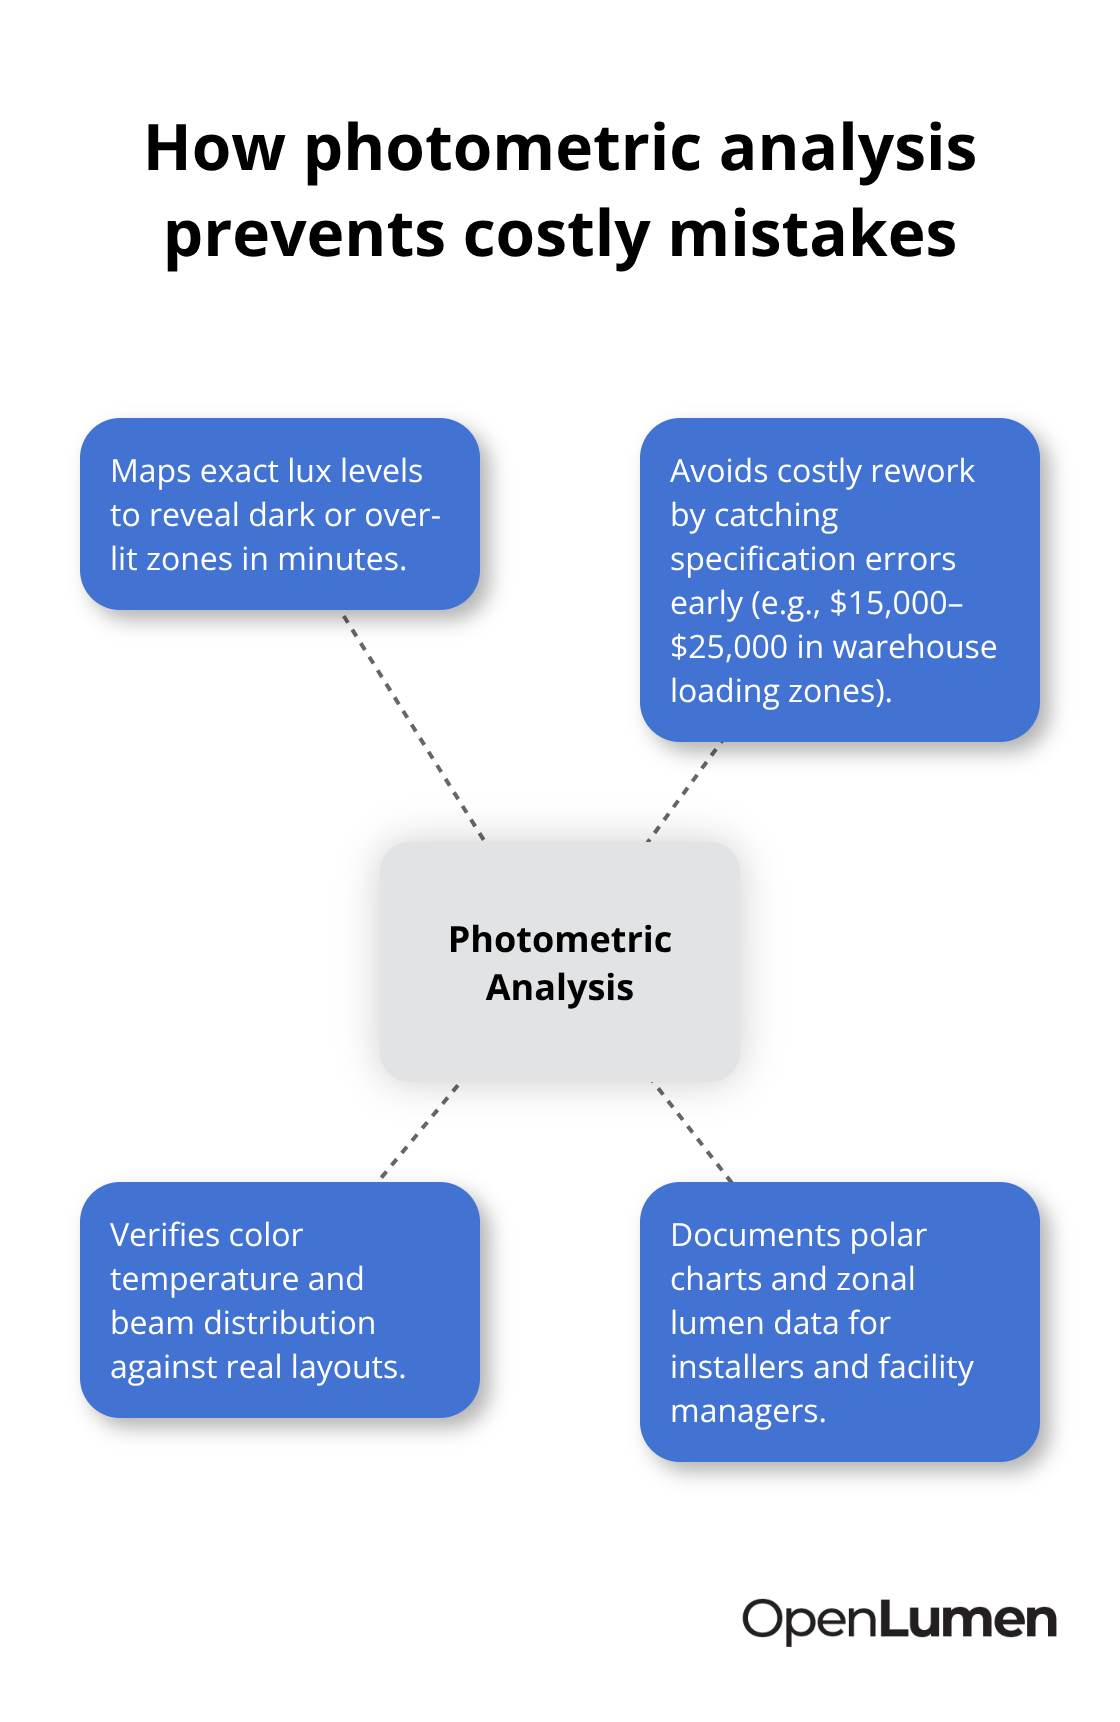
Software tools let you map illuminance across a space in minutes, showing exact lux levels at work planes, floors, and display areas. This real-time feedback catches specification errors before they become expensive mistakes. A warehouse designer using photometric analysis avoids the $15,000–$25,000 cost of replacing undersized fixtures in loading zones or removing excess fixtures from storage areas.
The analysis also reveals whether your fixture selection actually delivers the color temperature and beam distribution you specified-some luminaires perform differently in real layouts than their datasheets suggest. Validate your design with actual photometric data, not assumptions. When you run calculations, document polar charts and zonal lumen data so installers understand what they’re aiming for and facility managers know what to expect at handover.
Select Fixtures With Verified Performance Data
Specification accuracy determines whether your design performs or fails in the field. Selecting fixtures involves three simultaneous decisions: wattage, beam angle, and shielding for glare control. A 4000K pendant rated at 3000 lumens with a 40-degree beam creates different results than the same color temperature at 3500 lumens with a 60-degree beam-the second spreads light wider but dimmer, potentially missing task areas.
Use luminaire libraries with verified photometric data to compare options side-by-side rather than relying on manufacturer marketing claims. Document your selections in a specification sheet showing fixture model, quantity, mounting height, aiming angle, and color temperature for each zone. This discipline prevents site confusion where contractors install fixtures differently than intended because the original spec was vague.
Generate Documentation That Supports Installation and Maintenance
Professional documentation supports warranty claims if performance falls short-you have proof of what was specified and installed. Generate reports that include illuminance maps, fixture schedules, control logic, and maintenance requirements so your client understands the system and can maintain it properly. Clear documentation transforms a one-off project into a foundation for future upgrades and troubleshooting.
Conclusion
Lighting design best practices rest on three core disciplines: specify illuminance and color temperature based on actual tasks, avoid the pitfalls that waste energy and frustrate occupants, and validate your decisions before installation. Projects that follow this path deliver comfort, control costs, and perform reliably for years. Projects that skip these steps accumulate expensive problems-glare complaints, energy waste, maintenance surprises, and retrofit costs that dwarf the original savings.
The shift toward precision happens when you treat lighting as a system rather than decoration. Digital tools make this shift practical by showing exactly how light behaves in your space before a single fixture arrives on-site. Real-time illuminance mapping catches dark spots and over-lit zones that sketches miss, while verified luminaire libraries prevent specification errors that lead to installation confusion and performance gaps.
Start your next project by identifying task requirements and specifying illuminance accordingly, then run photometric analysis before ordering fixtures. Select luminaires with verified performance data and document your choices clearly-these steps take hours upfront and save thousands in avoided mistakes, energy waste, and maintenance headaches. Visit OpenLumen to see how digital tools transform lighting design from guesswork into precision.
The information provided is for general educational purposes only and should not be considered professional engineering or lighting design advice. Always verify project requirements, local codes, and specifications with qualified professionals before making final decisions.


