Corridor lighting design tips often get overlooked, yet they make the difference between a safe, welcoming space and one that feels dim or harsh. At OpenLumen, we’ve seen how poor corridor lighting wastes energy, creates safety hazards, and frustrates building occupants.
This guide walks you through the standards, strategies, and common mistakes that shape effective corridor lighting. You’ll learn how to balance brightness with efficiency and avoid the pitfalls that cost money and compromise performance.
Lighting Levels and Standards for Corridors
Corridor lighting isn’t one-size-fits-all. Hotel corridors, office hallways, and hospital walkways have distinct requirements because occupants use them differently and spend varying amounts of time in them.
Understanding Illuminance Requirements by Space Type
Hotel corridors are typically long, enclosed spaces with rooms on both sides and minimal natural light, so they need reliable ceiling-mounted lighting to deliver consistent brightness without creating shadows between fixtures. Office corridors should support circadian rhythm and morning light exposure, which means the color temperature and spectrum matter as much as raw brightness. Hospital corridors need to combine daylight (where available) with electric lighting to maintain full color perception under changing seasonal conditions, since artificial lighting alone has a limited spectrum.
The difference isn’t subtle-a hotel corridor might need 50 lux of ambient light, while an office corridor benefits from 200+ lux to support concentration and productivity. This variation means you must assess your specific building type before selecting fixtures or planning spacing.
Spacing and Fixture Density Prevent Dark Spots
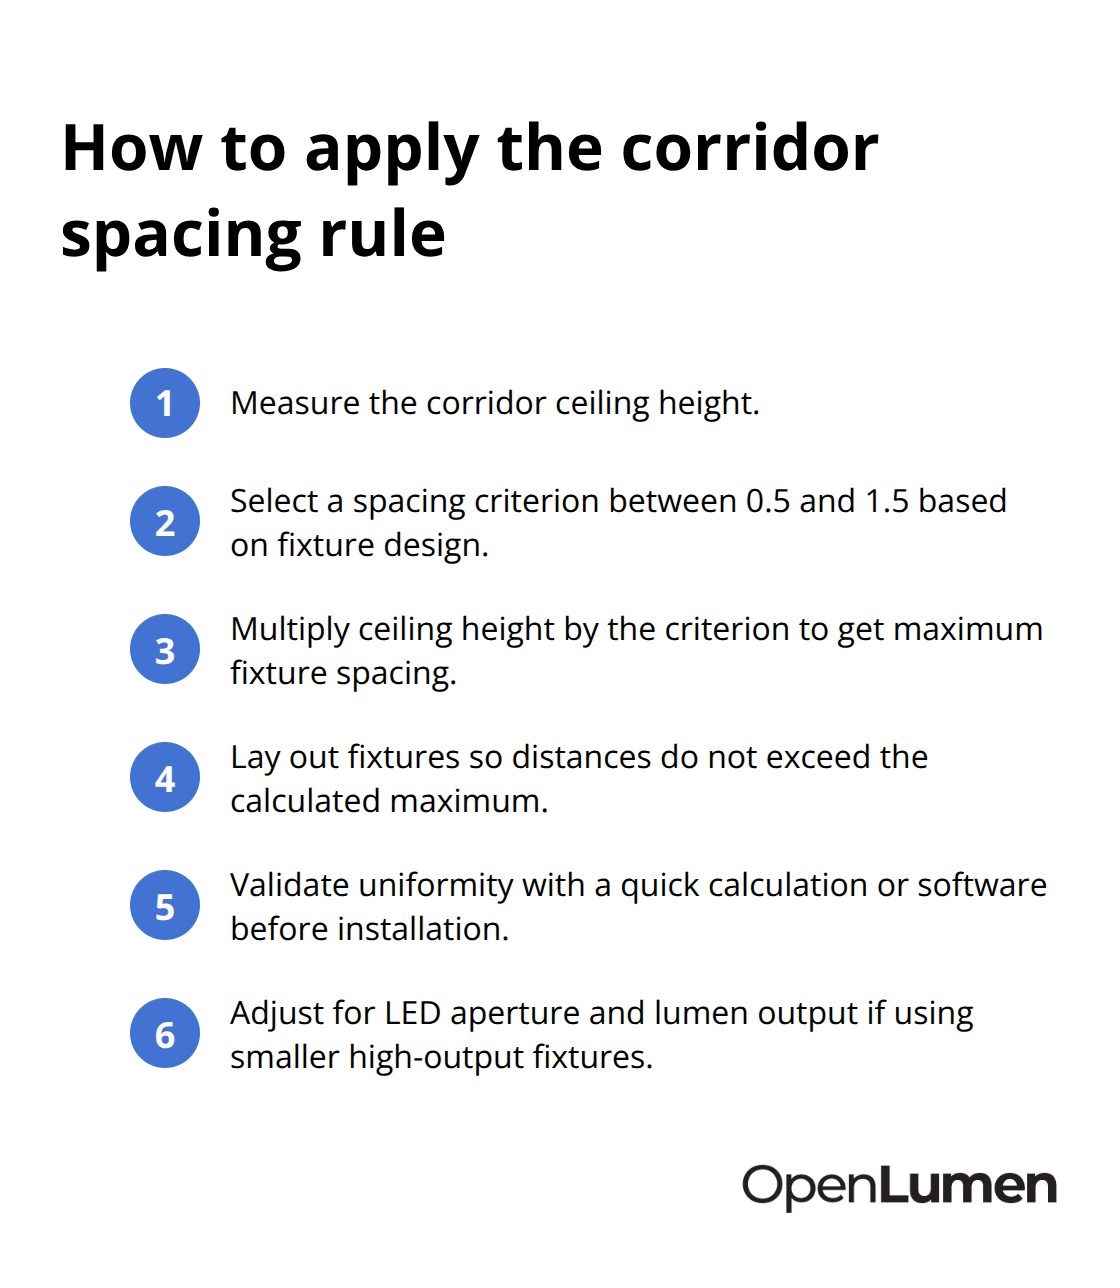
The math behind corridor lighting is straightforward but often ignored. Ceiling height directly determines how far apart you can space fixtures. The spacing rule multiplies ceiling height by a spacing criterion (typically 0.5 to 1.5, depending on fixture design) to find maximum distance between lights.
For an 8-foot ceiling with a 1.5 criterion, you can space 6-inch fixtures up to 12 feet apart. Space them farther and the corridor reads like spotlights with noticeable dark bands. Space them closer and you waste energy and risk glare. LED technology shifts this calculation because smaller 4-inch fixtures now deliver high lumen output, letting you tighten spacing without oversized apertures or excessive fixture counts.
A practical approach: calculate spacing first, then select fixture types that fit your layout rather than forcing a preferred fixture into an undersized corridor. This prevents the common mistake of installing too few large fixtures that create shadows, or too many small fixtures that consume unnecessary power.
Meeting Building Codes and Regulations
Building codes like ASHRAE/IES 90.1 and 10 CFR 434 set minimum illuminance standards, but they also push energy performance. The U.S. spends roughly one-quarter of its electricity budget on lighting-over 37 billion dollars annually-making corridor lighting a high-impact target for efficiency gains.
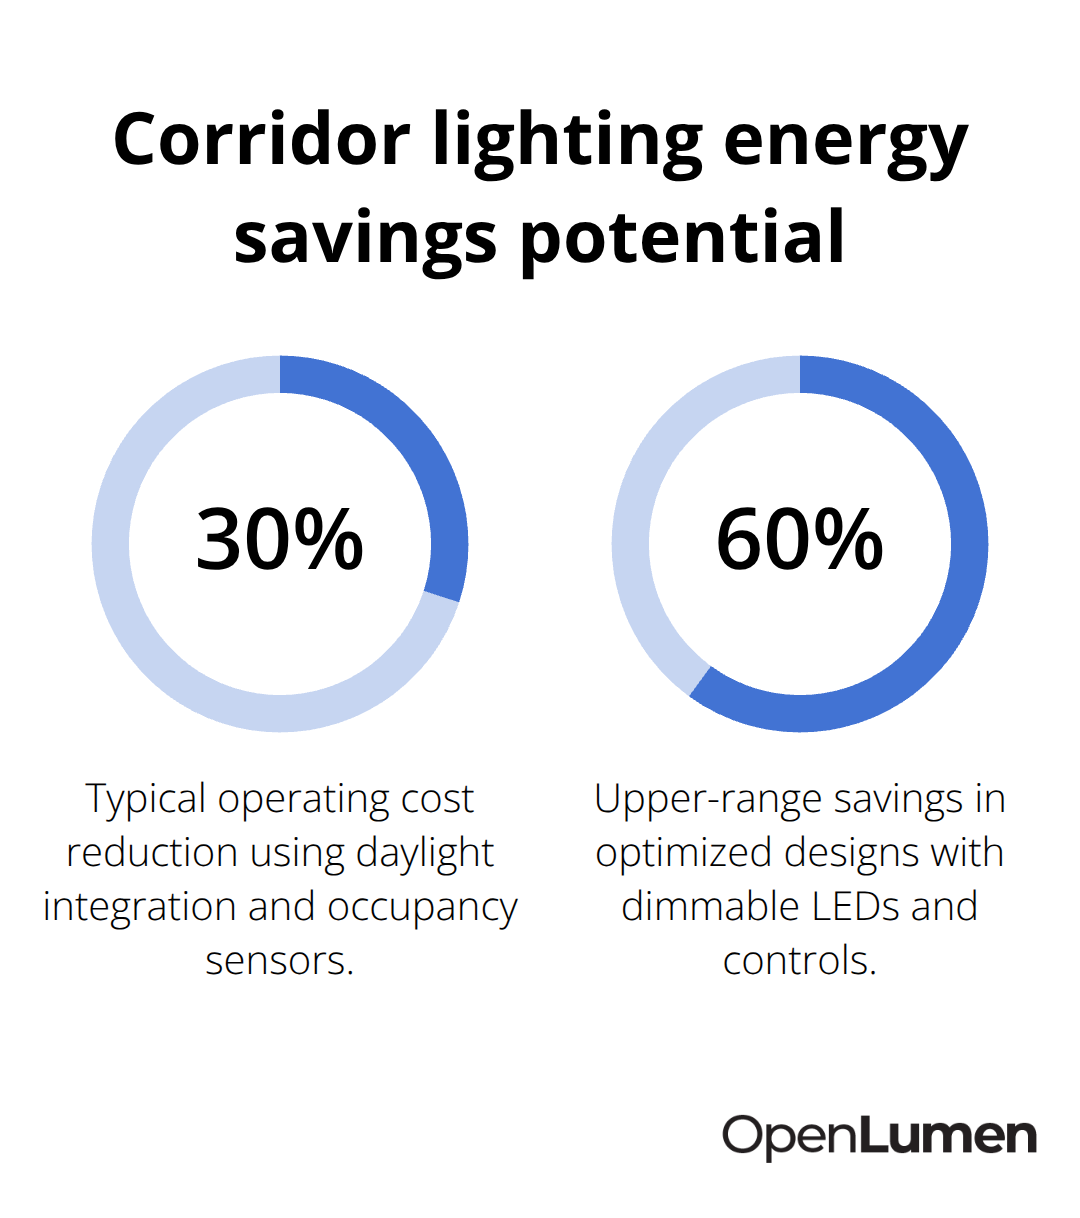
Energy-efficient corridor lighting combined with daylight integration and occupancy controls can cut operating costs by 30–60% while maintaining visual quality. This isn’t a trade-off between brightness and savings; it’s about using the right tools. Fluorescent T8 and T5 lamps offer strong energy efficiency and long life, while dimmable LED systems paired with occupancy sensors deliver even greater reductions.
Balancing Brightness with Energy Efficiency
For retrofit projects, CFLs work in downlight and wall-washing roles, though many retrofit options aren’t dimmable and mercury disposal must be considered. The key: align your design with local codes from the start, then select lamps and ballasts that exceed minimum requirements without overshooting.
Rapid-start ballasts cost more upfront but extend lamp life and work reliably with dimming controls, paying back the investment through reduced maintenance and energy use. Once you’ve locked in your illuminance targets and spacing strategy, the next step involves selecting the right fixture types and mounting heights to actually achieve that even light distribution across the entire corridor length.
Design Strategies for Even Light Distribution
Even light distribution separates professional corridor designs from amateur installations that waste energy and frustrate occupants. The foundation rests on three interconnected decisions: how far apart to space your fixtures, which fixture types deliver uniform light without glare, and how your walls, ceilings, and finishes either amplify or waste the light you install.
Spacing Fixtures to Eliminate Dark Spots
Spacing fixtures correctly is non-negotiable. According to Eaton’s Lighting Division, the spacing rule multiplies ceiling height by a spacing criterion to determine maximum distance between fixtures, with criteria typically ranging from 0.5 to 1.5 depending on fixture design and beam angle. In an 8-foot corridor with a criterion of 1.5, a standard fixture can space up to 12 feet apart before shadows appear between lights. Exceed this distance and occupants notice dark bands along the floor; compress spacing and you overshoot brightness while consuming unnecessary power.
LED fixtures change this equation because smaller 4-inch apertures now deliver high lumen output, letting you maintain even spacing without oversized ceiling penetrations. A 10-watt recessed LED replaces older 20-watt fluorescent designs while actually improving light distribution. This matters in practice because tighter spacing with smaller fixtures costs less to install than fewer large fixtures that create the spotlighting effect corridors should avoid.
Start with your ceiling height, then calculate maximum spacing before you select any fixture. This discipline prevents the expensive mistake of installing fixtures only to discover uneven brightness that forces costly repositioning.
Choosing the Right Fixture Types and Mounting Heights
Fixture type and mounting height directly control brightness uniformity and visual comfort. Indirect-direct linear fluorescent luminaires and pendants deliver soft, even illumination across corridor ceilings because they distribute light both upward (bouncing off ceiling) and downward, reducing harsh shadows and the harsh ceiling appearance that low-mounted downlights create.
Wall-mounted sconces spaced along corridors help distribute light evenly and minimize shadows, particularly in hotel and healthcare settings where wayfinding matters. In office corridors supporting circadian-friendly lighting, ceiling height influences color temperature perception, so mount fixtures high enough that occupants don’t view the lamp directly, which causes glare.
Using Reflectance and Surface Materials to Your Advantage
Reflectance transforms your lighting strategy because light-colored ceilings and walls near white reflect more light and make long walkways feel brighter without adding fixtures. Conversely, dark or black ceilings absorb light, requiring higher lumen output to achieve the same perceived brightness.
Paint corridor ceilings light grey or white and use reflective finishes on walls to amplify your lighting investment. Wood features like dark plank ceilings or coffered designs influence light diffusion and warmth, so pair them with adequate fixture density to prevent the corridor from feeling dim despite good material choices. Shiplap and board-and-batten walls reflect light effectively and brighten corridors when combined with proper fixture spacing.
Energy-efficient corridor lighting combined with daylight integration and occupancy controls can cut operating costs by 30 to 60 percent while maintaining visual quality, according to Eaton’s analysis. Selecting reflective finishes now reduces operating costs for years to come. With your spacing strategy locked in and your fixture types selected, the next critical step involves identifying and avoiding the design mistakes that undermine even the best-planned installations.
Common Corridor Lighting Mistakes and How to Avoid Them
Corridor lighting failures fall into three categories: oversizing your fixture count and wasting energy, creating harsh shadows or glare that frustrate occupants, and ignoring maintenance demands that compound costs over time. These mistakes happen because designers skip the spacing calculation or assume more light automatically means better performance. We see this pattern repeatedly, and the fix starts with discipline around your initial design decisions.
The Overfitting Trap
Oversizing fixture density is the most expensive mistake. A corridor with an 8-foot ceiling and 50-foot length needs roughly four to five recessed fixtures spaced 10 to 12 feet apart, not six or seven. Installing six 10-watt recessed lights consumes 60 watts; dropping to four properly spaced fixtures reduces consumption to 40 watts, a 33 percent energy reduction according to Eaton’s Lighting Division analysis. That difference compounds across hundreds of corridors in a large facility.
Many designers install extra fixtures as insurance against darkness, but this approach wastes power and creates the very glare problems they hoped to prevent. Calculate your spacing first using ceiling height and fixture spacing criterion, then stick to that number. Resist the urge to add fixtures during installation because the corridor feels dim during a brief site visit without occupants and ambient activity.
Glare and Shadow Conflicts
Harsh shadows appear when fixtures space too far apart, but glare emerges when you compensate by installing fixtures too close or selecting high-output lamps without proper diffusion. A 4-inch LED fixture delivering 1000 lumens viewed directly causes discomfort; the same fixture with a frosted lens or diffuser mounted at proper height feels natural.
Wall-mounted sconces should space 8 to 10 feet apart and mount 6 to 7 feet high to avoid direct lamp view while distributing light along walls. Dark ceilings absorb light and make shadows more pronounced, so if your corridor has a dark ceiling, you must either lighten it or increase fixture density, neither of which solves the underlying design flaw. Choose light-colored ceilings and reflective wall surfaces first, then size your fixture count to match those conditions rather than fighting poor surface materials with excessive lighting power.
Maintenance Blindness
Corridor lighting often gets ignored after installation, but maintenance costs spiral when you select incompatible lamp types or fail to plan for fixture cleaning. Mixing T8 and T5 fluorescent lamps in the same corridor complicates inventory and extends downtime when failures occur. Specify one lamp family across all corridors in a building, then standardize replacement procedures and stock spare lamps accordingly.
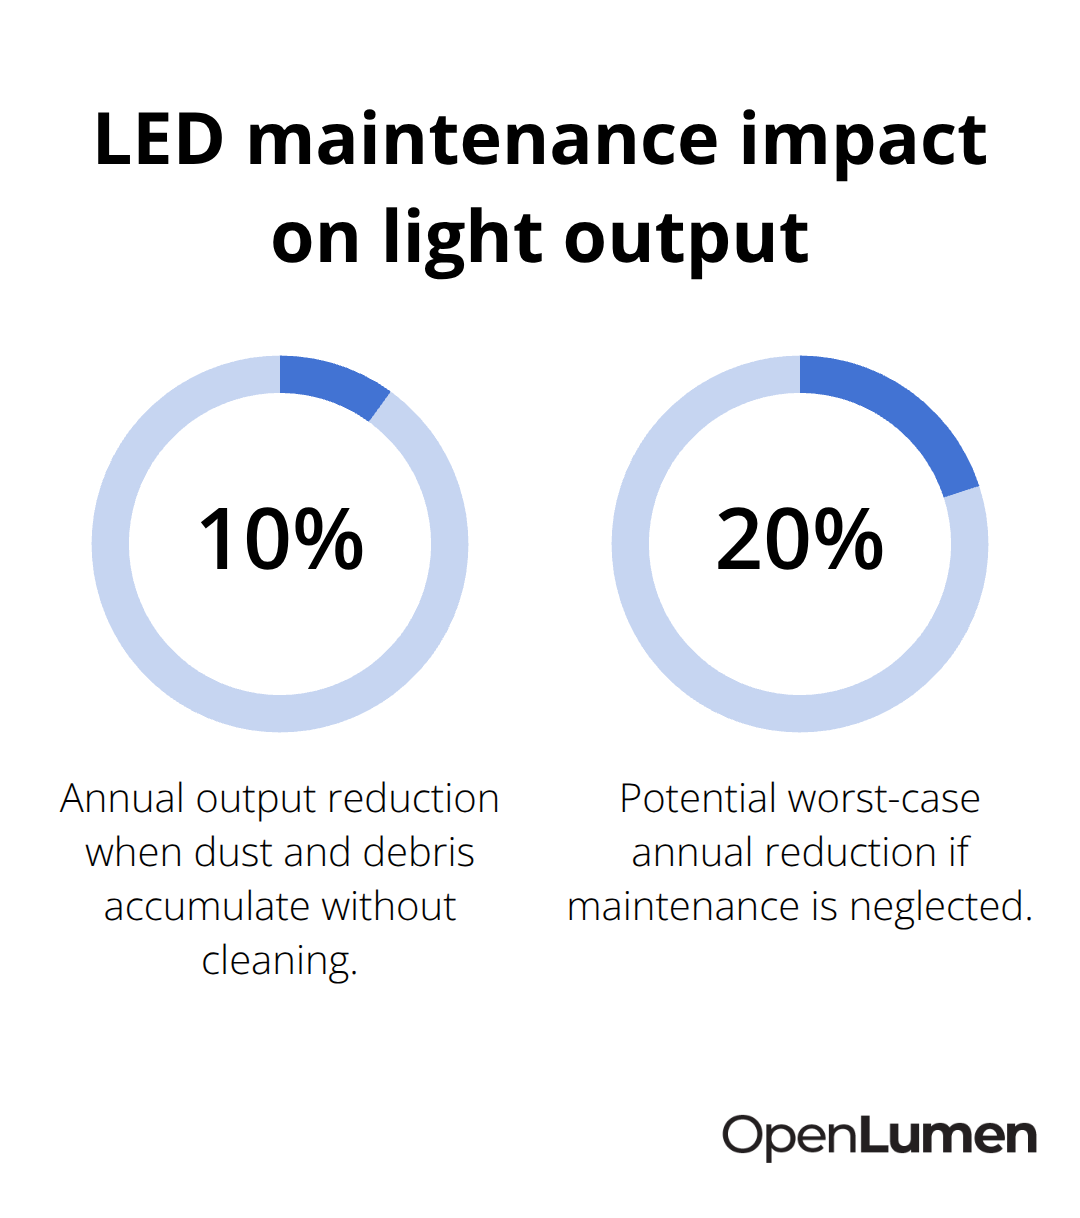
LED fixtures require less frequent maintenance but accumulate dust and debris that reduces output by 10 to 20 percent annually if left unaddressed. Plan for annual cleaning and inspect fixtures every two years to catch early failures before they create dark spots.
Dimmable ballasts and occupancy sensors reduce lamp stress and extend life, so the upfront cost of controls pays back through reduced replacement frequency and lower labor costs.
Final Thoughts
Effective corridor lighting design tips rest on three core decisions that you must make before installation begins. Calculate your spacing based on ceiling height and multiply that figure by your fixture’s spacing criterion to find the maximum distance between lights. An 8-foot corridor with a 1.5 criterion allows 12-foot spacing; respect this math and your corridor stays bright and uniform. Ignore it and you’ll either create dark bands that require costly repositioning or install excess fixtures that consume unnecessary power.
Surface materials amplify your lighting investment far more than most designers realize. Light-colored ceilings and reflective walls bounce light throughout the space, reducing the fixture count you need and cutting energy costs by 30 to 60 percent compared to dark finishes. This isn’t optional; it’s the difference between a design that works and one that fails. Standardize your lamp types across all corridors, plan for annual cleaning, and inspect fixtures every two years to prevent the slow decline that turns a well-lit corridor into a dim, frustrating space.
When you’re ready to validate your corridor lighting design, OpenLumen lets you run real-time illuminance analysis and generate professional photometric reports before installation. The platform tests spacing decisions, compares fixture options, and confirms brightness uniformity so you eliminate guesswork and costly field corrections.
The information provided is for general educational purposes only and should not be considered professional engineering or lighting design advice. Always verify project requirements, local codes, and specifications with qualified professionals before making final decisions.


