Poor lighting in warehouses and factories costs money, creates safety risks, and makes work harder. Dark zones, uneven distribution, and wasted energy are problems we see constantly.
At OpenLumen, we’ve helped facilities fix these issues with practical industrial lighting layout solutions. This guide shows you how to design layouts that work, cut costs, and keep your team safe.
Why Your Warehouse Lighting Fails
Fixtures Placed Without Calculation
Dark zones are the most visible failure in industrial lighting, but they reveal a deeper problem: fixtures are often placed without proper calculation. Most facilities install lights based on guesswork or outdated standards instead of measuring actual illuminance levels across the work area. The result is pockets of inadequate light where workers struggle to read labels, spot hazards, or operate equipment safely.
OSHA requires a minimum of 5 foot-candles at floor level in general work areas, yet many warehouses hover near this bare minimum while other zones exceed 100 foot-candles, creating harsh contrasts that tire eyes and reduce visibility. Uneven distribution also masks another cost: energy waste. When you over-light some areas to compensate for dark zones, you burn money in the bright spots while the dim areas remain unsafe.
Loading Docks and Task-Specific Lighting
Loading docks typically need 20–30 foot-candles for safe handling of small parts and labeling. Without a photometric plan, facilities either undershoot and risk accidents or overshoot and waste 15–20% of their lighting budget on unnecessary lumens. This imbalance happens because most facility managers lack the tools to calculate illuminance precisely across different zones.
The Cost of Outdated Fixtures
High operating costs compound the problem because most warehouses still rely on older fluorescent or metal halide fixtures that consume far more power than necessary. Switching to LED cuts electricity costs by more than 70%, yet many facility managers hesitate because they underestimate the payback period. A typical LED warehouse retrofit pays for itself in 2–3 years through energy savings alone.
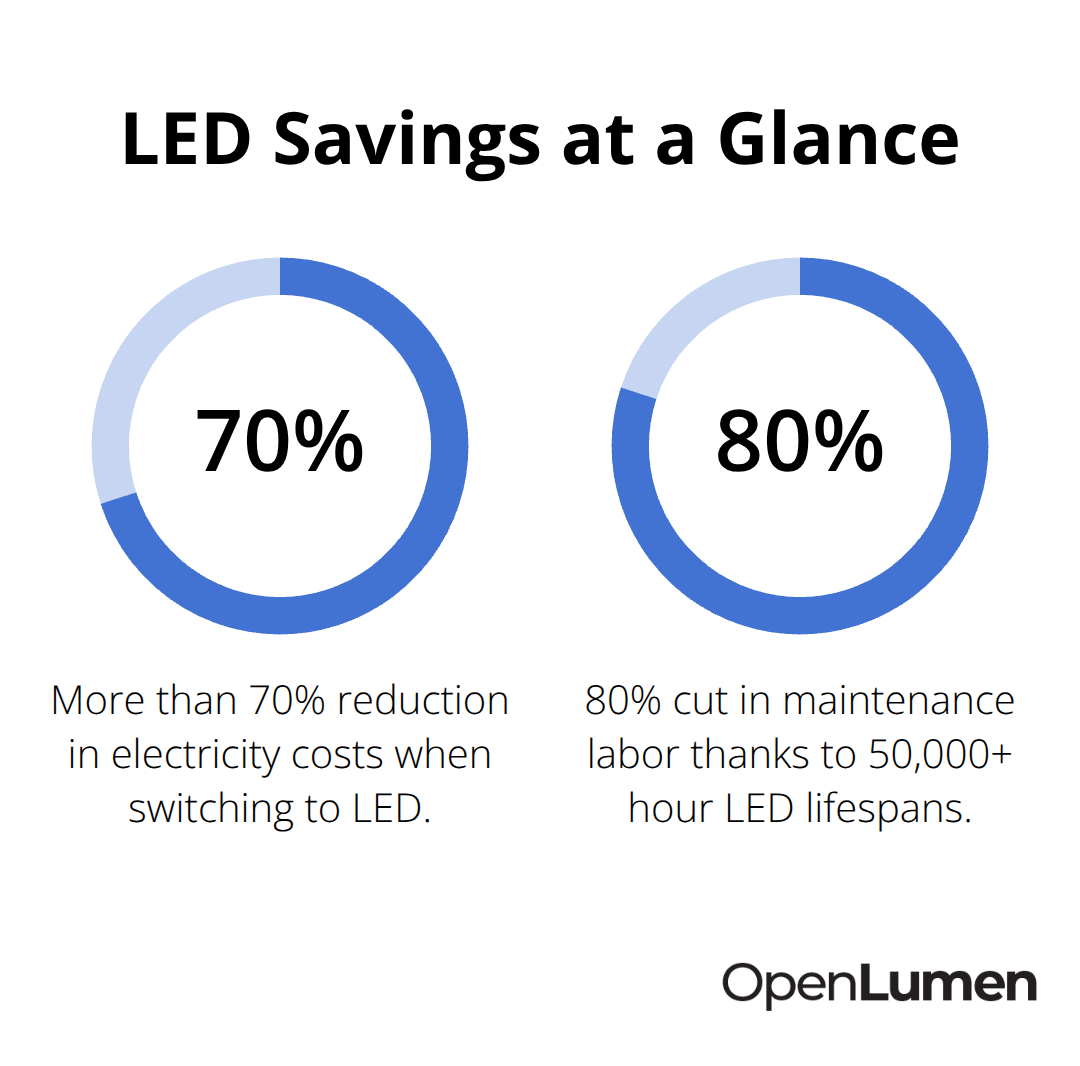
The math strengthens further when you factor in reduced maintenance-LED fixtures last 50,000+ hours compared to 10,000 hours for fluorescents. Fewer replacement cycles mean less labor downtime and lower overall facility costs.
Safety Hazards and Liability
Safety hazards from poor visibility connect directly to inadequate or uneven lighting. Forklift accidents, picking errors, and trips increase in poorly lit aisles, and these aren’t minor inconveniences-they’re liabilities that trigger OSHA fines ranging from $5,000 to over $50,000 per violation. The fix isn’t simply installing more fixtures; it’s designing layouts with proper photometric analysis that ensures uniform coverage, adequate brightness for each task, and minimal glare.
A well-planned layout prevents dark zones, reduces energy waste, and eliminates the safety gaps that cost facilities money and put workers at risk. The next section shows you how to calculate illuminance levels and select the right fixtures to build that layout.
How to Calculate Light Levels and Choose the Right Fixtures
Map Your Facility by Task Zone
Start with illuminance targets specific to your task, not a one-size-fits-all number. OSHA sets a minimum of 5 foot-candles for general warehouse floors, but that baseline is too low for most real work. Loading docks handling small parts need 20–30 foot-candles. General warehousing tasks land around 160 foot-candles.
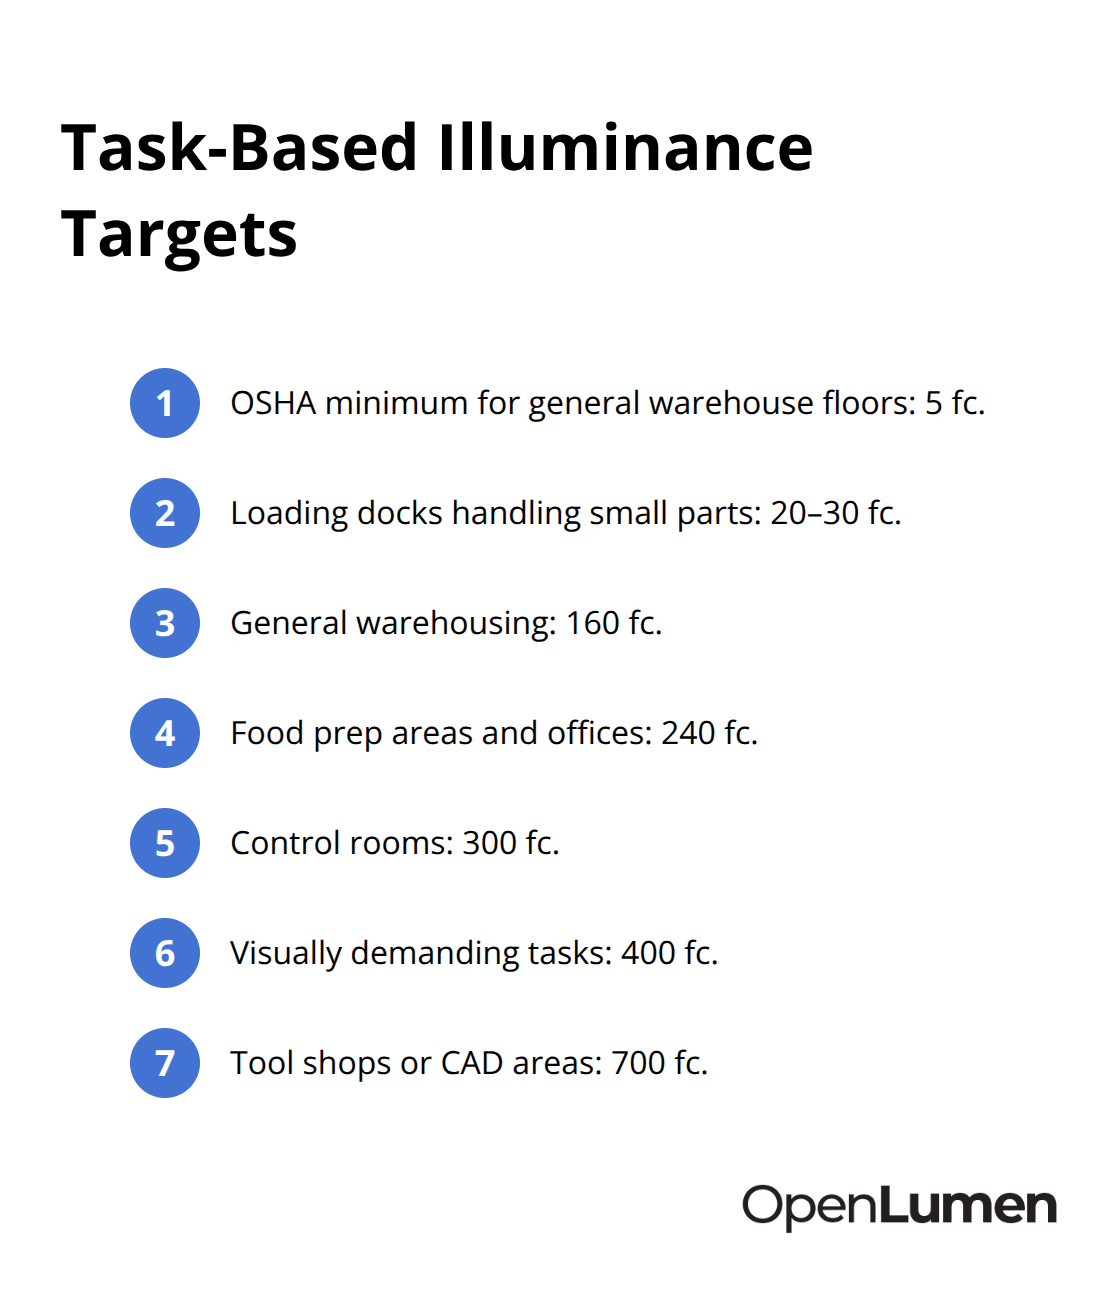
Food prep areas and offices inside warehouses demand 240 foot-candles. Control rooms require 300 foot-candles, visually demanding tasks need 400 foot-candles, and tool shops or CAD work areas push toward 700 foot-candles. The IES Lighting Handbook provides these benchmarks because uneven light creates two problems: workers in dim zones make mistakes, and you waste money overlighting other areas to compensate. Map your facility by task zone first, then assign illuminance targets to each. This step alone prevents the common mistake of treating your entire warehouse as a single lighting problem.
Select Fixtures Based on Height and Beam Angle
Fixture selection depends on ceiling height and beam angle, not preference. For ceilings under 15 feet, use roughly 80-watt fixtures. Between 15 and 25 feet, move to 100–105 watt fixtures. At 45 feet, you need around 240 watts. At 50 feet, plan for 320 watts. Wide beam angles between 90 and 120 degrees work for open production floors and general aisles. Narrow 60-degree beams prevent light from scattering over tall racking and reduce glare in tight aisles. Long 120-degree beams help you avoid light blockage directly above shelves.
Calculate Spacing and Total Lumens
Space fixtures based on mounting height: at 10 feet, space them 10 feet apart; at 15 feet, 14 feet apart; at 25 feet, 20 feet apart; at 35 feet, 25 feet apart. These ratios maintain uniform coverage without dark zones between fixtures. For a 1,000 square foot warehouse at 10 feet ceiling height, you need approximately 32,000 lumens total. At 15 feet, bump that to 35,000 lumens. At 25 feet, 39,000 lumens. At 35 feet, 42,000 lumens. These numbers account for realistic fixture performance and room reflectance.
Prioritize LED Performance and Color Quality
Energy efficiency matters most during fixture selection because LED delivers 50,000-plus hour lifespans versus 10,000 hours for fluorescents, cutting maintenance labor by 80 percent. LED also converts most energy into light rather than heat, reducing your cooling load and cutting electricity costs by more than 70 percent. Try fixtures with at least 80 CRI (Color Rendering Index) so workers can distinguish colors accurately-critical for quality control and label reading. Target 5000K color temperature as your standard because it provides crisp visibility and supports alertness without creating harsh glare. Specify flicker-free drivers in your fixture selection because flicker causes eye strain and increases error rates in detail-oriented tasks.
Validate Your Design Before Installation
Once you select fixtures, validate spacing and coverage through photometric analysis before ordering anything. This step catches design errors when they cost nothing to fix, not after installation. Professional photometric tools generate point-by-point illuminance calculations and heatmap visualizations that show exactly where light lands across your floor plan. This validation prevents costly mistakes and gives you confidence that your layout will perform as intended.
Validating Your Layout Before You Order Anything
Run Photometric Analysis to Catch Design Errors Early
Photometric analysis stops you from guessing about fixture placement, beam angles, and spacing. The math behind these decisions only reveals itself through point-by-point illuminance calculations across your floor plan. Without this validation, dark zones appear after installation or you discover half your facility is overlit-both expensive mistakes. Professional photometric tools generate heatmap visualizations that show exactly where light lands, how evenly it distributes, and whether your design meets the illuminance targets you set for each task zone. These tools also calculate foot-candle levels at specific points on your floor, letting you verify that loading docks hit 20–30 foot-candles, general warehousing reaches 160 foot-candles, and control rooms achieve 300 foot-candles. The data catches design errors before installation when fixes cost nothing instead of thousands in labor and materials.
Use Real-Time Calculations to Validate Coverage
Real-time illuminance analysis transforms your floor plan into actionable data. You input your ceiling height, fixture selections, and spacing, and the platform instantly calculates illuminance across your entire layout. This approach shows you exactly where performance meets your targets and where adjustments are needed. Heatmaps reveal dark zones that manual calculations miss, and point-by-point data confirms that your fixture spacing maintains uniform coverage without gaps.
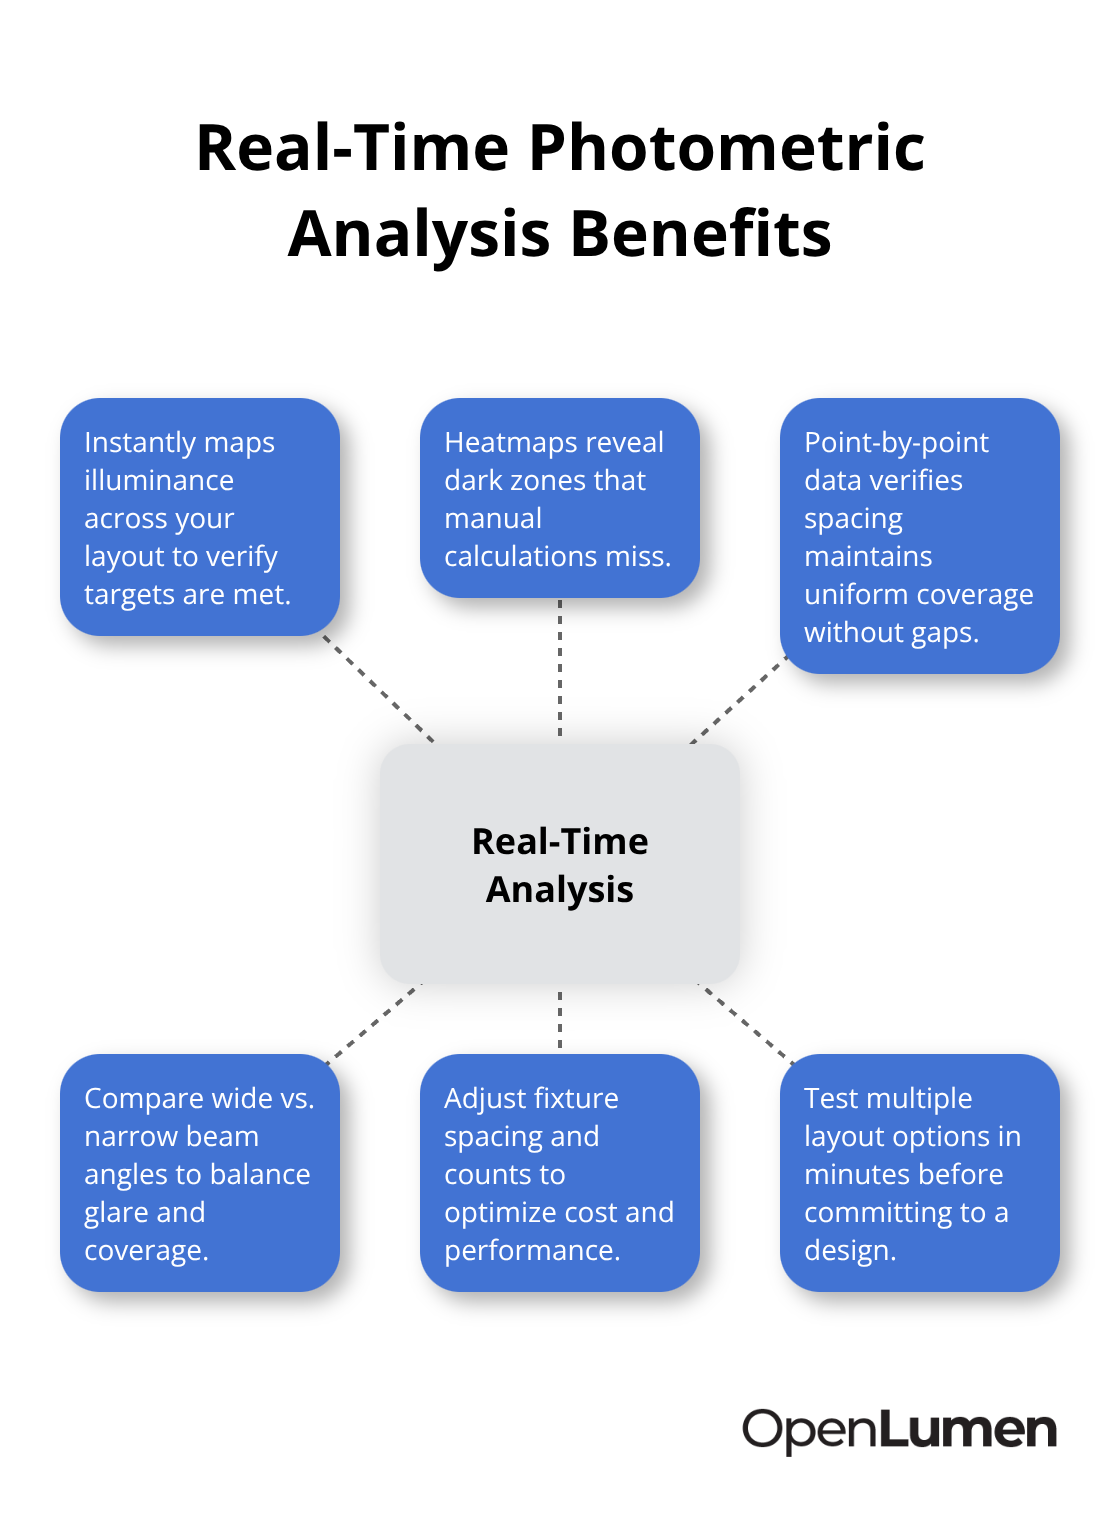
The speed of real-time analysis means you can test multiple layout options in minutes, comparing wide beam angles against narrow beams or adjusting fixture spacing to optimize both coverage and cost. This flexibility prevents the costly mistake of locking into a design before validation.
Generate Professional Reports That Stakeholders Understand
Professional reports transform your photometric data into documents that facility managers, procurement teams, and contractors actually use. Facility managers need energy savings projections and maintenance cost reductions. Procurement teams want fixture schedules with part numbers and quantities. Contractors require 2D and 3D placement diagrams. A solid report includes foot-candle heatmaps, fixture schedules, placement diagrams, and energy consumption estimates compared to your current system. Including utility rebate information strengthens the business case because LED warehouse retrofits often qualify for incentives that offset 20–30 percent of project costs, shortening payback from 2–3 years to 18–24 months. Reports also document compliance with OSHA minimum standards and IES recommendations, protecting your facility from liability if an accident occurs.
Test Your Layout Before Installation Begins
Testing your layout before installation means running calculations, generating reports, and securing stakeholder approval before a single fixture ships. This step eliminates surprises, prevents costly rework, and builds confidence across your team that the new lighting system will perform as promised. Validation also identifies opportunities to reduce fixture counts or adjust spacing without sacrificing coverage-changes that lower material costs and installation labor. When you present a tested, documented layout to contractors and stakeholders, you establish credibility and accelerate project approval.
Final Thoughts
Better industrial lighting layouts start with three fundamentals: calculating illuminance targets for each task zone, selecting fixtures based on ceiling height and beam angle, and validating your design through photometric analysis before installation. Skip any of these steps and you’ll either overspend on energy, create safety gaps, or waste money on fixtures that don’t perform as expected. The real shift happens when you stop treating warehouse and factory lighting as a one-time installation and start treating it as a measurable system.
Dark zones disappear when you map illuminance across your floor plan. Energy waste drops when you right-size fixtures instead of guessing. Safety improves when you verify that loading docks hit 20–30 foot-candles and general warehousing reaches 160 foot-candles before contractors arrive. Modern tools remove the friction from this process by letting you run real-time illuminance analysis, generate heatmaps that show exactly where light lands, and produce professional reports that stakeholders understand in minutes.
Map your facility by task zone, define your illuminance targets, and validate an industrial lighting layout before ordering anything. This approach costs nothing upfront and prevents expensive mistakes after installation. OpenLumen combines photometric analysis, a community-verified luminaires library, and professional reporting in a free, browser-based platform where you design your layout, run instant calculations, and generate reports that include fixture schedules, placement diagrams, and energy savings projections.
The information provided is for general educational purposes only and should not be considered professional engineering or lighting design advice. Always verify project requirements, local codes, and specifications with qualified professionals before making final decisions.


