Most lighting projects fail before installation even begins. Poor planning, wrong fixture choices, and skipped analysis create expensive mistakes that waste time and money.
At OpenLumen, we’ve seen how common lighting design mistakes happen when contractors skip photometric data or ignore site conditions. The good news is that these errors are completely preventable with the right approach and tools.
Why Photometric Data Matters More Than You Think
Wattage Tells You Almost Nothing
Most contractors pick fixtures based on wattage or how they look in a catalog, then hope the installation works out. This approach fails because wattage tells you almost nothing about how light actually distributes in a space. A 100-watt fixture in one model delivers completely different illumination patterns than a 100-watt fixture from another manufacturer. Polar patterns show exactly where light goes-the intensity in every direction from the fixture. Without this data, you cannot predict whether shadows will ruin a workspace, whether dark spots will appear in corners, or whether the fixture will even hit the target area.
Understanding Zonal Lumens and Beam Spread
Zonal lumens break down light output by direction, so you know how much usable light reaches a work surface versus disappearing into the ceiling. Beam spread determines the footprint of light on the ground. A narrow beam creates a tight circle of bright light with dark surroundings, while a wide beam spreads light across a larger area with lower intensity. These differences matter enormously. A 4000-lumen fixture with a 15-degree beam illuminates only a small table, while the same 4000 lumens with a 60-degree beam spreads across an entire room but feels dimmer in the center.
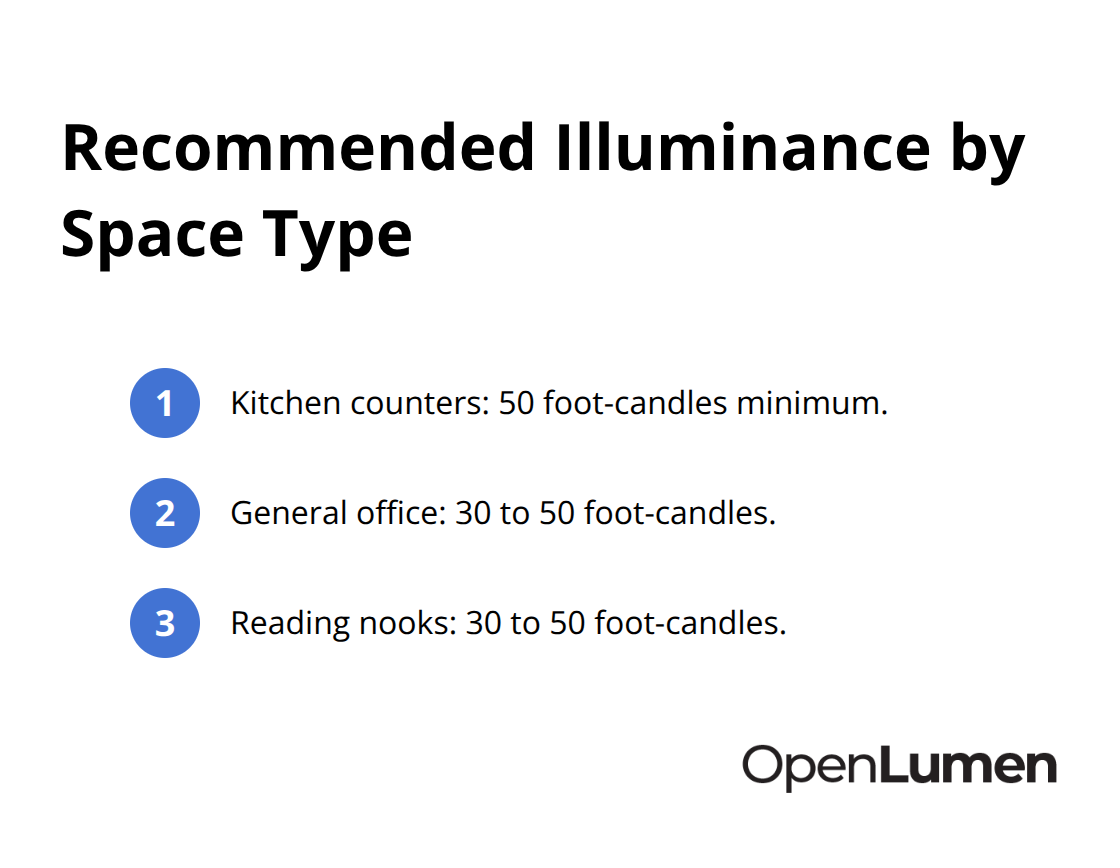
Illuminance Analysis Prevents Installation Failures
Skipping illuminance analysis before installation almost guarantees problems. Illuminance measures how much light actually lands on a surface, measured in foot-candles or lux. A fixture might claim high lumens, but if its polar pattern sends most light upward or to the sides, the work surface receives far less illuminance than required. Task areas like kitchen counters need 50 foot-candles minimum, while general office spaces need 30 to 50 foot-candles. Reading nooks need 30 to 50 foot-candles for comfortable vision. Without running an illuminance calculation, you cannot confirm these thresholds are met.
Real-time feedback tools let you input photometric data, place fixtures in a floor plan, and instantly see illuminance values across every surface before you order anything. This approach prevents costly rework because you catch problems at the design stage, not after installation. The difference between guessing and measuring is the difference between a successful project and an expensive failure. Once you understand how photometric data shapes real-world performance, the next critical step involves assessing your actual site conditions-because even perfect fixture selection fails without proper planning.
What Site Conditions Are You Actually Ignoring
Site assessment separates successful lighting designs from expensive failures, yet most contractors treat it as optional. The reality is blunt: a perfectly selected fixture installed in the wrong space with wrong assumptions produces terrible results. Your site conditions-ambient light, how people use the space, ceiling height, and surface reflectance-determine whether your photometric data translates into real performance or becomes useless numbers on paper. Skipping this assessment means you design in a vacuum, then blame the fixture when the installation disappoints.
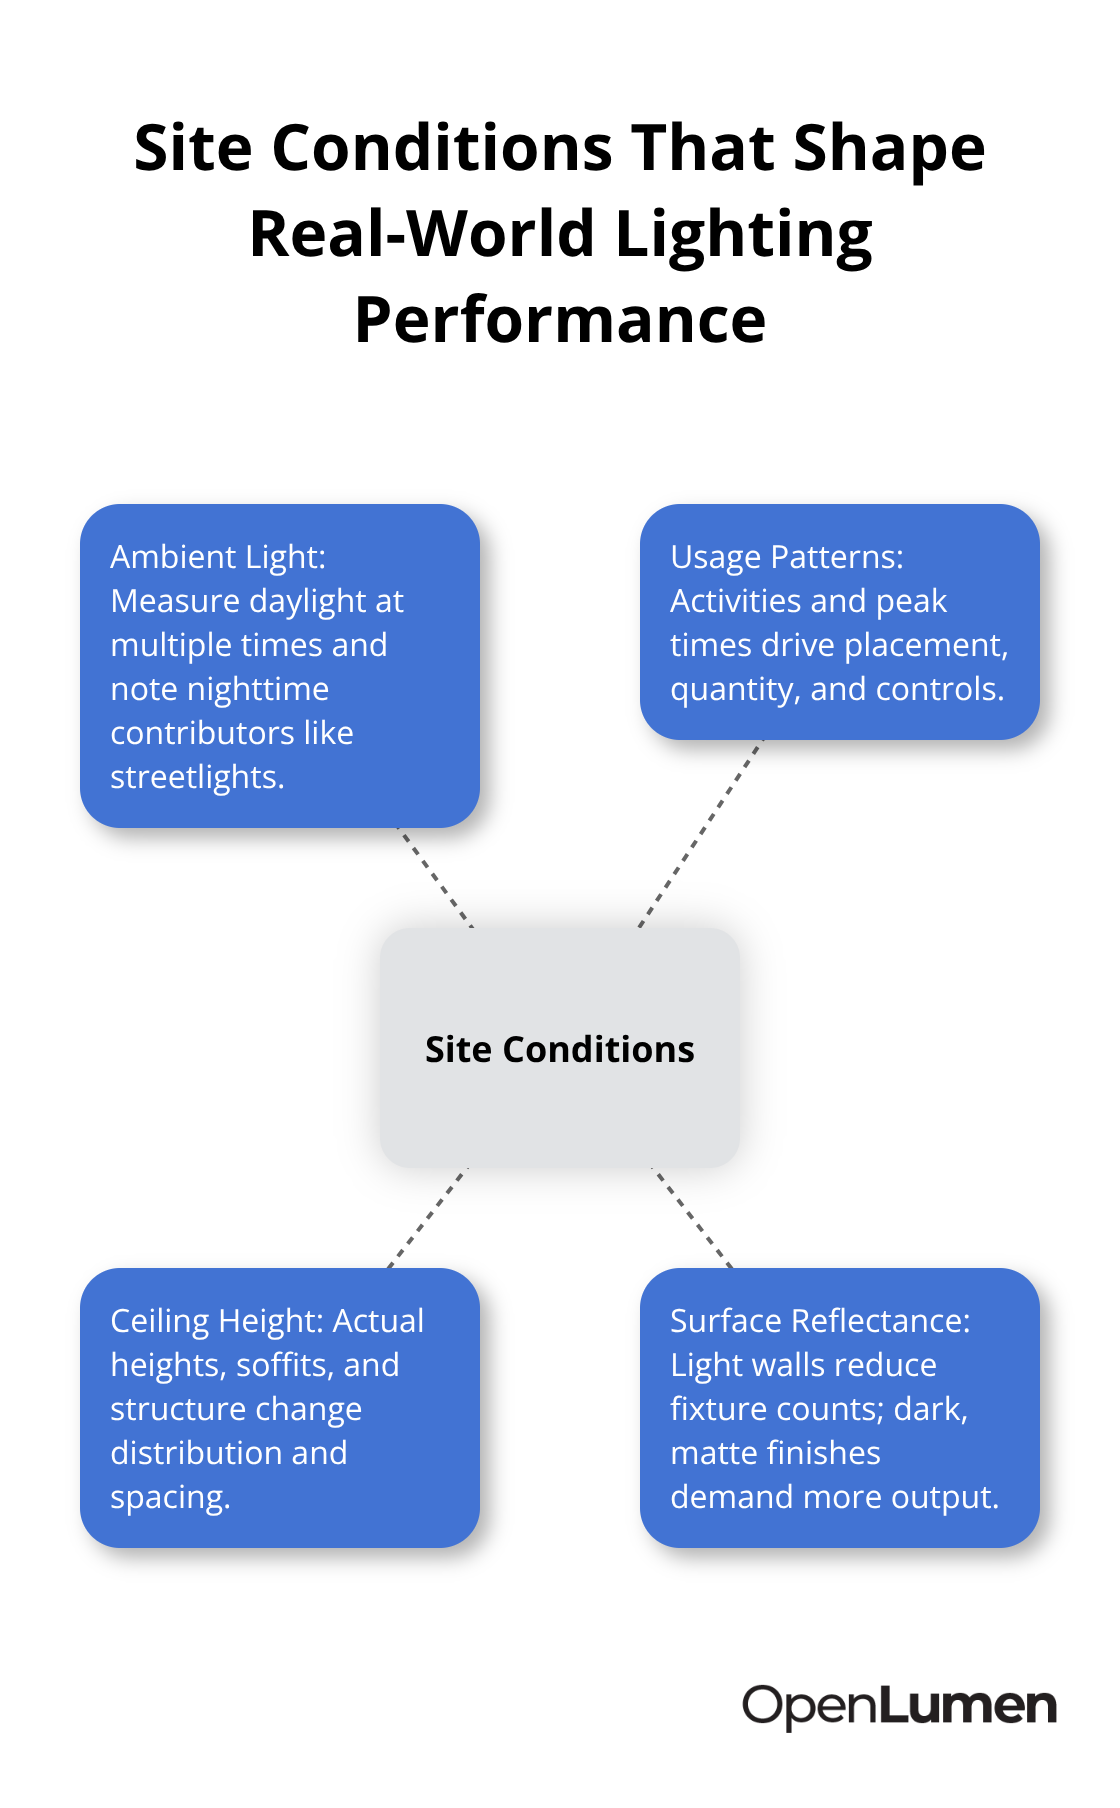
Measure Ambient Light Before You Design Anything
Existing light conditions in a space change everything about fixture selection. A room flooded with daylight from large south-facing windows needs different fixtures than a windowless basement. Many contractors design for nighttime performance alone, then watch the space feel washed out during the day because they never measured baseline conditions. Use a light meter to check ambient illuminance at different times-morning, midday, and evening. Document whether the space receives direct sun or diffuse daylight. Check streetlights and neighboring buildings that contribute to nighttime ambient light. This takes thirty minutes but prevents selecting fixtures that are either oversized for daytime or undersized for evening use. A kitchen receiving strong morning sun needs different pendant fixtures than a north-facing kitchen in the same building. Without measuring, you guess. With measurement, you design.
Understand How People Actually Use the Space
Lighting design fails when contractors design for an imaginary perfect use case instead of real human behavior. A home office used for video calls at 9 AM needs different lighting than one used for detailed drawing at 2 PM. A retail showroom needs accent lighting for nighttime displays but also functional task lighting for daytime shopping and staff work. Interview the space owner or manager about peak usage times, activities, and pain points. Does the kitchen get used for cooking at 6 AM or mostly for entertaining at 7 PM? Are employees working at desks all day or moving between stations? Does the retail floor need flexibility for seasonal displays? These answers drive fixture placement, quantity, and control strategy far more than square footage does. A 200-square-foot office with one person working solo needs different lighting than a 200-square-foot open workspace with four people collaborating. Usage patterns also reveal where shadows cause real problems versus where they add visual interest.
Account for Ceiling Height and Surface Reflectance
Ceiling height and wall reflectance multiply or divide your effective light output without changing a single fixture. A 10-foot ceiling with white walls reflects light and makes spaces feel brighter. The same fixture in an 8-foot ceiling with dark walls absorbs light and feels dim. Measure actual ceiling heights in the space-vaulted ceilings, dropped soffits, and structural elements all affect fixture placement and performance. Check wall and ceiling colors or finishes. High-reflectance surfaces (white, light gray, glossy) bounce light around and reduce the number of fixtures you need. Low-reflectance surfaces (dark paint, matte finishes, wood paneling) absorb light and require more fixtures or higher output. A contractor designing for an average 9-foot ceiling with medium-gray walls then installing in a 7-foot ceiling with dark wood paneling will see illuminance drop significantly. These aren’t minor details-reflectance values between 10 and 80 percent create massive differences in perceived brightness. Measure, document, and account for these conditions before selecting fixture quantities or placement.
Use Real Data to Validate Your Selections
Site conditions alone don’t guarantee success-you must validate your fixture selections against the actual space. Input your measured ambient light, ceiling height, and reflectance values into your design calculations. Run illuminance analysis across the floor plan to confirm that your selected fixtures deliver the required foot-candles at work surfaces. This step catches mismatches between theory and reality before installation. A fixture that performs perfectly in a white-walled showroom may fall short in a dark-paneled office. Tools that combine photometric data with site measurements let you test different fixture quantities and placements instantly, showing exactly how your choices perform in the specific space you’re lighting. This validation transforms site assessment from a checkbox task into actionable intelligence that shapes every decision moving forward.
Where Fixture Choices Go Wrong
Most contractors make three critical mistakes that trigger expensive rework: they select fixtures based on wattage alone, they underestimate how shadows create dark spots that ruin functionality, and they pick color temperatures that clash with the actual application. These errors compound because they often happen simultaneously, and by the time the fixtures arrive on site, the damage is already done.
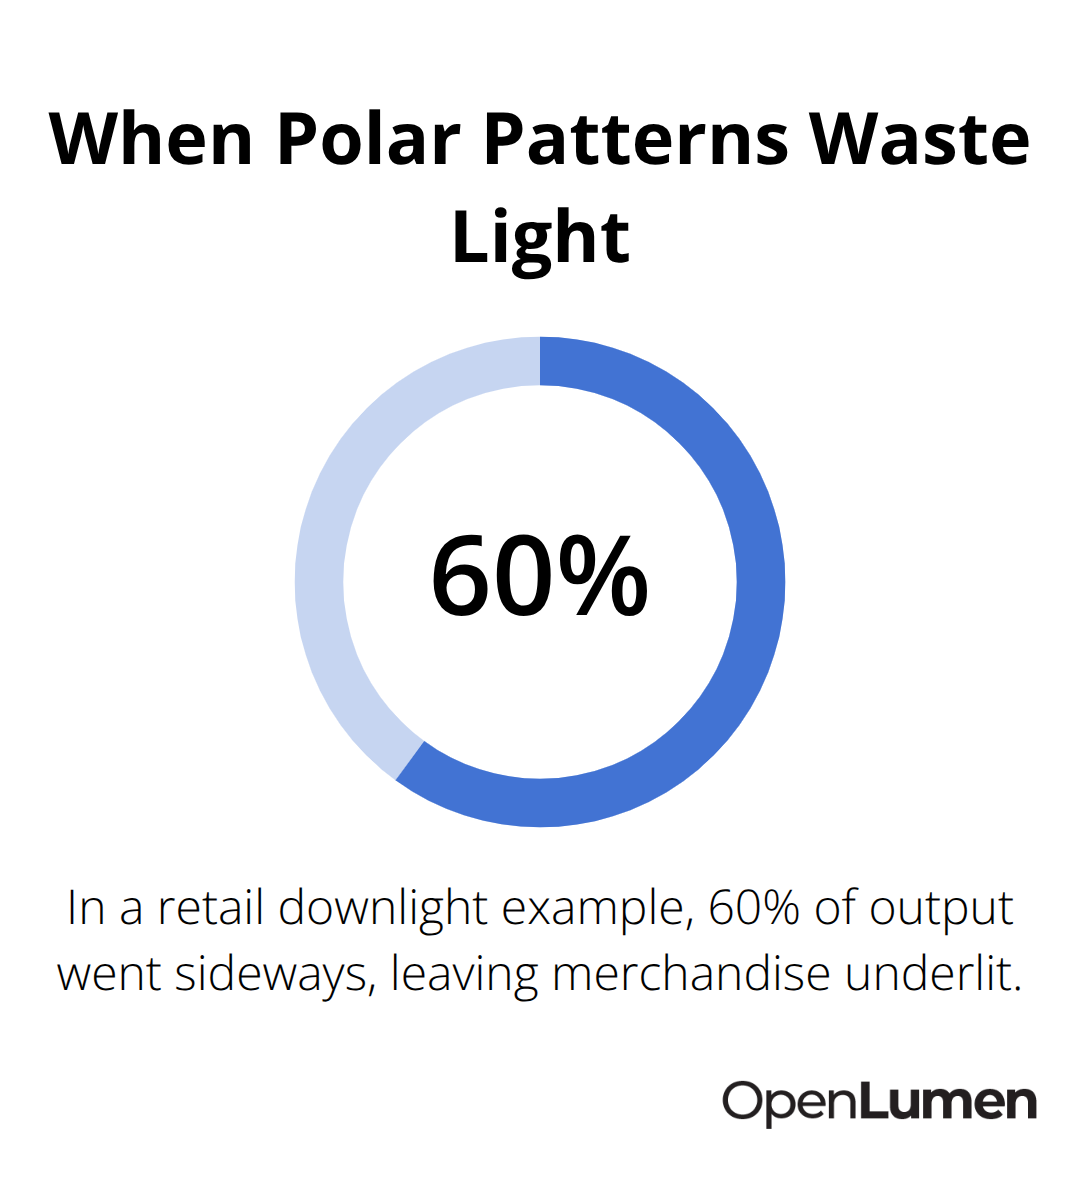
Wattage is meaningless as a selection criterion-a 50-watt LED downlight from one manufacturer produces completely different illuminance than a 50-watt model from another. What matters is photometric performance: polar patterns, zonal lumens, and beam spread. Yet contractors still receive fixture recommendations from distributors who quote wattage first, creating a false sense of confidence. The reality is brutal: you cannot know if a fixture will work until you run illuminance analysis on the actual floor plan with real photometric data.
A contractor designing a retail space might select a 50-watt downlight because it sounds efficient, only to discover during installation that the polar pattern sends 60 percent of light sideways, leaving the merchandise dimmer than required. The fix means ordering different fixtures, rewiring, and explaining delays to the client. This happens constantly because the industry still treats wattage as a proxy for performance.
Shadows and Dark Spots Appear When You Skip Analysis
Shadows appear unpredictably when contractors skip photometric analysis and rely on spacing rules of thumb. A common mistake involves spacing recessed downlights at 8-foot intervals in a 12-foot ceiling, assuming even coverage. Photometric data reveals the polar pattern creates dark rings between fixtures-exactly where customers stand or work. The 50 foot-candles required for task areas drops to 15 foot-candles in the shadows, making the space feel dim and uneven.
Another frequent problem: pendant fixtures over islands or dining tables cast harsh shadows on faces when hung too high or selected with narrow beam spreads. Polar patterns show this instantly-a 25-degree beam creates a tight circle of light with dark surroundings, while a 50-degree beam spreads light wider and reduces shadow depth. Contractors who measure and adjust fixture placement based on photometric data catch these problems before installation. Those who rely on visual judgment or assumption discover shadows too late.
Dark spots in corners happen because contractors underestimate how much light gets absorbed by low-reflectance surfaces or blocked by structural elements. A fixture placed near a dark wall projects its light away from that corner, leaving it dim. Photometric analysis shows exactly where dark spots form and lets you adjust fixture quantity, placement, or beam direction to eliminate them. Without this step, you install fixtures, watch the space feel uneven, and face the cost of adding more fixtures or repositioning existing ones.
Color Temperature Mismatches Create Spaces That Feel Wrong
Selecting the wrong color temperature creates a space that feels wrong, looks wrong, and fails to support the intended activity-yet contractors often choose color temperature based on what looks good in a showroom sample, not on application requirements. A master bathroom needs 3000K warm white light for grooming and relaxation, but contractors sometimes install 5000K bright white thinking it provides better visibility. The result feels clinical and harsh, and the client requests changes.
A kitchen used for food preparation at 6 AM needs different color temperature than a kitchen used for entertaining at 7 PM, but most designs apply one temperature throughout. The International Commission on Illumination recommends 2700K to 3000K for residential spaces where relaxation matters, 3000K to 4000K for general office and retail work, and 4000K to 5000K for detailed technical tasks like surgical suites or jewelry inspection. These aren’t suggestions-they reflect how human perception and task performance actually respond to color temperature.
A retail showroom selling warm-toned furniture under 5000K bright white light looks completely different than under 3000K warm white, and customers perceive the products differently. Contractors who design without considering how color temperature affects both space perception and task performance create spaces that clients immediately want to change. The fix means replacing bulbs or fixtures, which costs time and money.
Validate Color Temperature Against Actual Application Needs
Smart design captures color temperature requirements during site assessment-ask whether the space supports relaxation, general work, or detailed tasks, then select color temperature accordingly. This single decision prevents costly callbacks and creates spaces that actually work for their intended purpose. Tools that display photometric data alongside color temperature options (polar charts, zonal lumens, beam spread) help you test how different fixtures perform before purchase. This approach transforms color temperature from a guessing game into a data-driven choice that matches the space and its users.
Final Thoughts
Lighting design failures stem from three preventable mistakes: skipping photometric data, ignoring site conditions, and selecting fixtures without validation. Every contractor who faced expensive rework, unhappy clients, or dark spots that appeared after installation made at least one of these errors. The pattern repeats across residential, commercial, and retail projects because the industry still treats fixture selection as a catalog exercise rather than a technical process.
Modern tools eliminate the friction that makes proper design feel difficult. OpenLumen provides a free, browser-based platform where you input photometric data, place fixtures on your floor plan, and instantly see illuminance values across every surface. You measure ambient light, ceiling height, and reflectance, then validate your fixture selections against real site conditions before installation, catching problems at the design stage instead of after installation.
The contractors winning projects and avoiding rework measure site conditions, run illuminance analysis, and validate color temperature against application needs. They stop guessing and start designing with data, which takes slightly longer upfront but eliminates costly mistakes, reduces callbacks, and builds client trust. This approach transforms common lighting design mistakes from inevitable problems into preventable errors.
The information provided is for general educational purposes only and should not be considered professional engineering or lighting design advice. Always verify project requirements, local codes, and specifications with qualified professionals before making final decisions.


