Lighting codes exist for a reason: safety, energy efficiency, and usability. Yet many designers and contractors struggle to navigate the requirements without costly mistakes or delays.
At OpenLumen, we’ve seen firsthand how proper lighting layouts for compliance save time and money. This guide walks you through the standards, common pitfalls, and practical tools you need to get it right the first time.
Understanding Lighting Codes and Standards
The first step to compliance is knowing which standards govern your specific project. ASHRAE 90.1 and the International Energy Conservation Code (IECC) are the primary benchmarks for commercial lighting energy efficiency in the US, updated every three years as technology advances. However, your jurisdiction may adopt modified versions of these standards, so you must verify the exact requirements for your building’s location before design begins. States and localities frequently customize codes, and ignoring local amendments is one of the fastest ways to fail inspection. For residential projects, requirements differ significantly-many residential spaces are exempt from Lighting Power Density limits but still subject to lumen efficacy requirements under IECC. Beyond energy codes, OSHA sets minimum illumination levels for worker safety, the ADA influences light distribution and glare reduction for accessibility, and the National Electrical Code (NFPA 70) governs all electrical safety and takes absolute precedence over energy codes. This means your lighting layout must satisfy energy efficiency targets while also meeting electrical safety requirements; these are not optional supplements but fundamental legal obligations.
Calculate Your Lighting Power Budget First
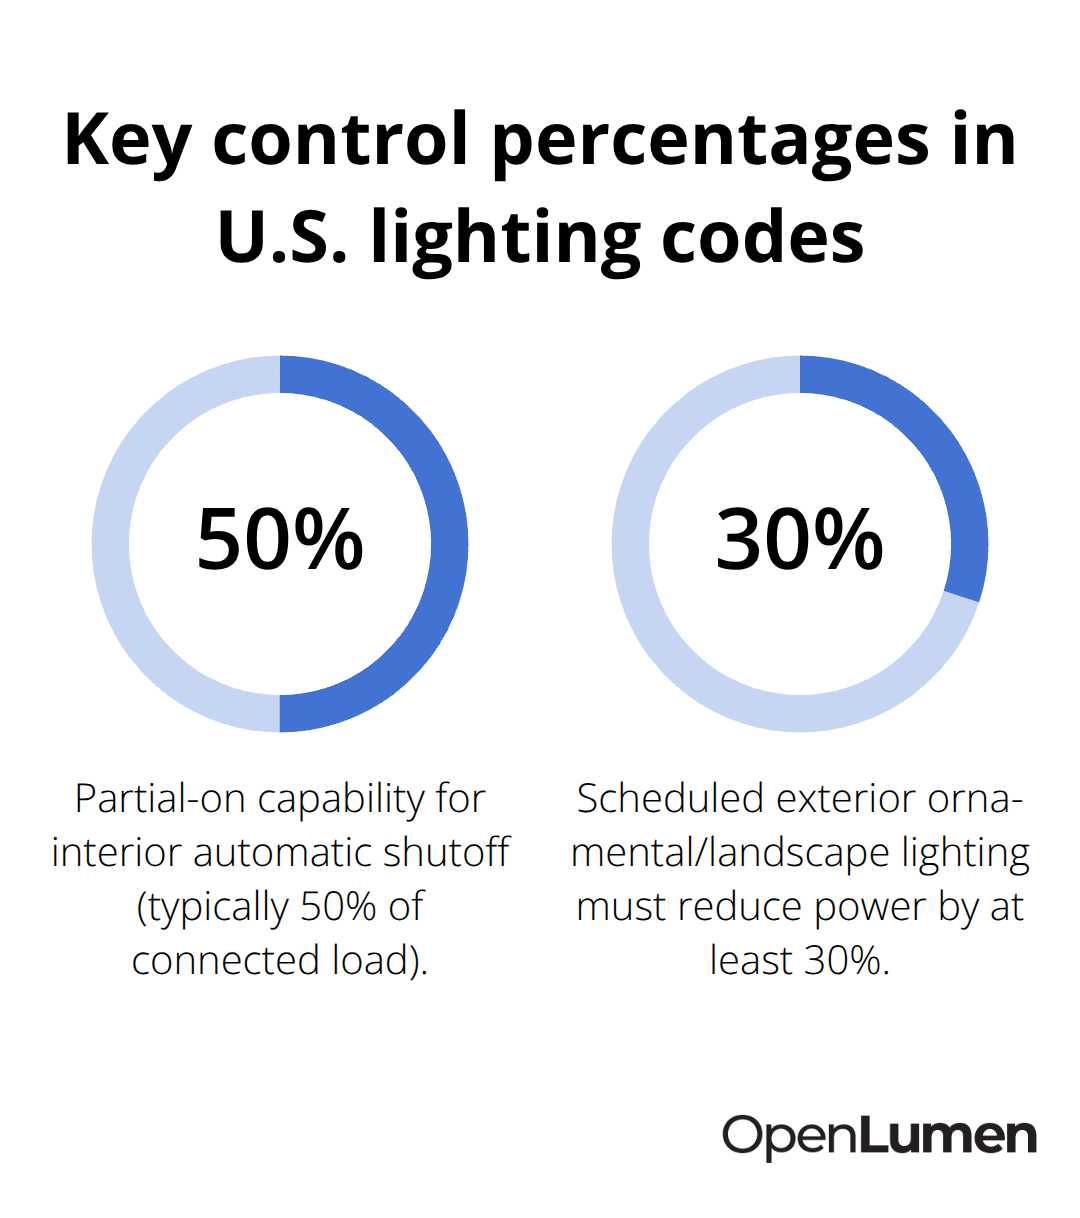
Lighting Power Density, measured in watts per square foot, is the core metric that controls your design. ASHRAE 90.1-2019 and IECC 2021 specify maximum LPD allowances for different space types, and exceeding these limits means code failure regardless of how well your layout performs otherwise. Calculate space-by-space LPD early in design-interior offices typically allow around 1.1 watts per square foot, while warehouses may permit 0.8 watts per square foot. Your photometric analysis must demonstrate compliance with these thresholds, and undersizing your fixture count to meet LPD targets often requires dimmable LED luminaires and mandatory controls. Many contractors overlook this calculation entirely and discover too late that their fixture selection burns through the budget, forcing expensive redesigns. Mandatory controls further constrain your choices: interior spaces must implement automatic shutoff with partial-on capability (typically 50% of connected load), and daylight-responsive controls are required in areas with window access. These controls reduce your effective power allowance, so you must account for them during layout planning.
Plan Control Strategies From the Start
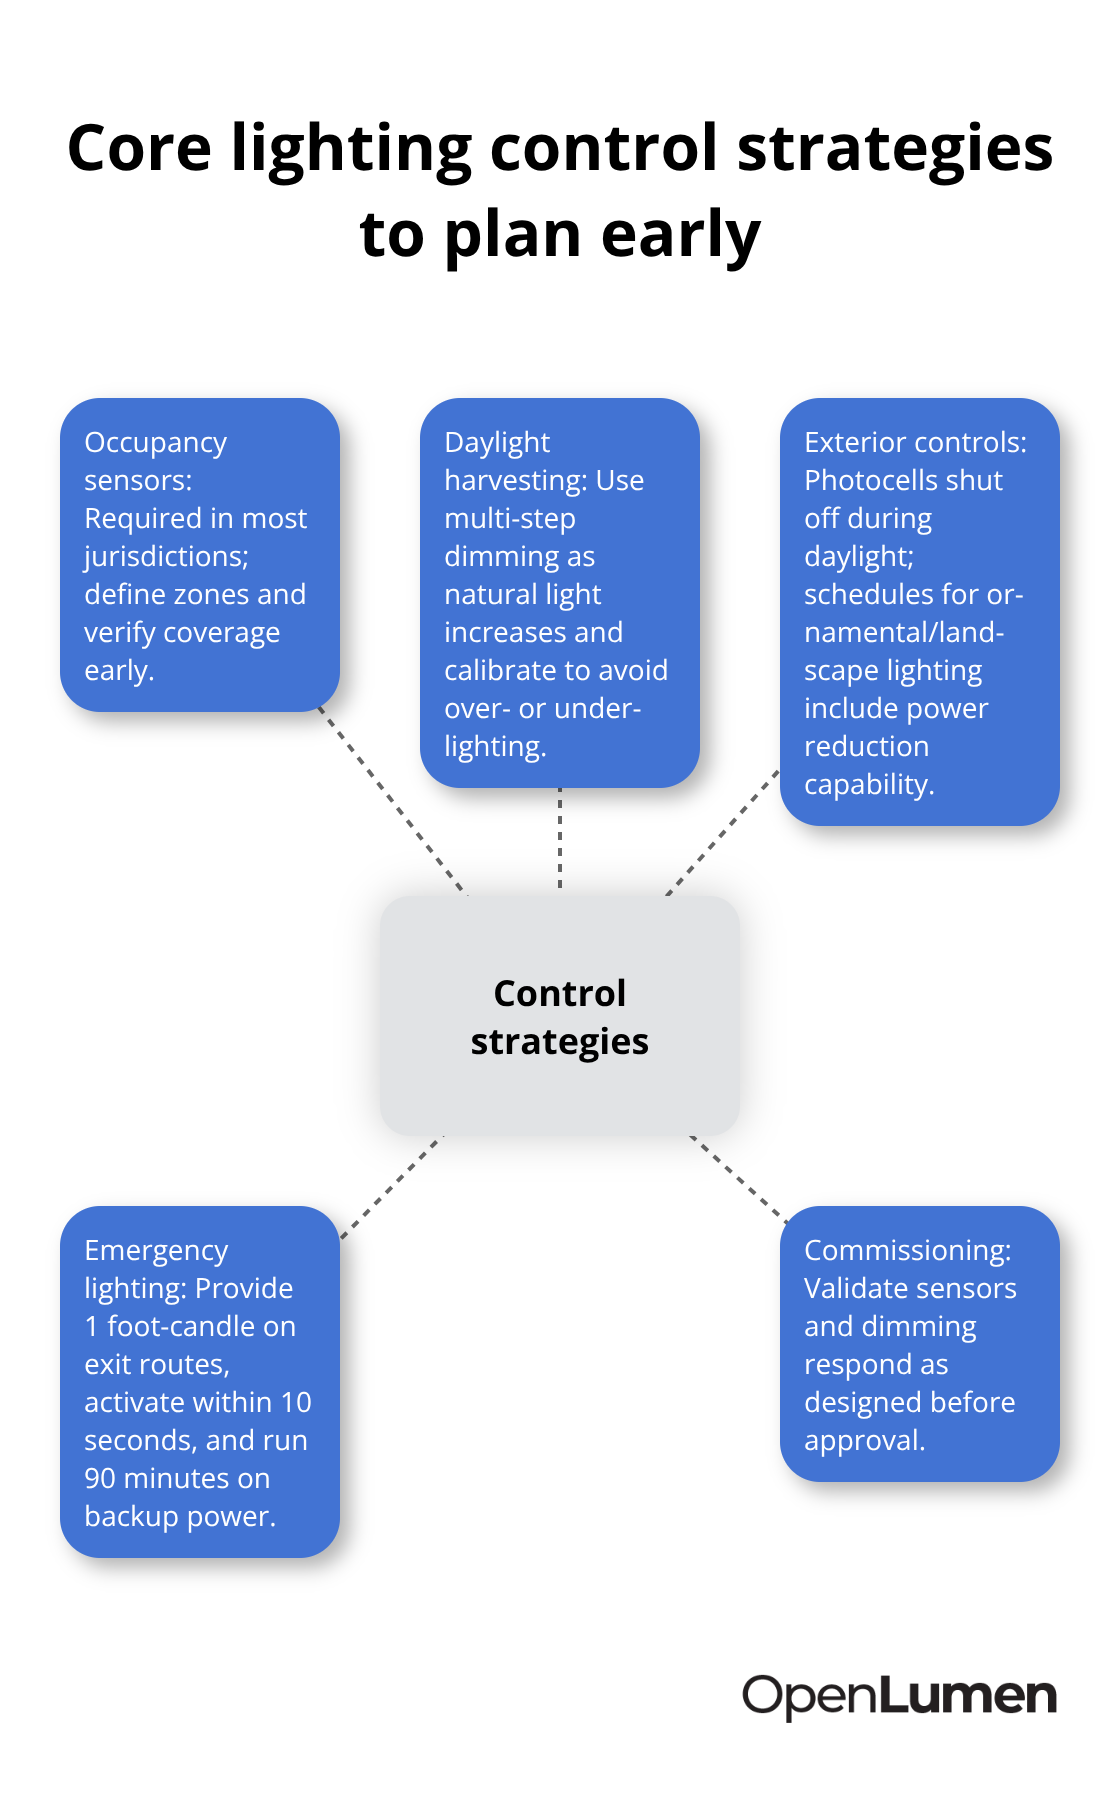
Occupancy sensors and daylight harvesting are not nice-to-have additions; they are code requirements in most jurisdictions and directly impact your LPD compliance. Daylight sensors must maintain consistent illumination through multiple steps-full power, two-thirds, one-third, and off-as natural light increases, and improper calibration causes either wasted energy or insufficient light. Exterior lighting faces equally strict demands: photocells must automatically shut off fixtures during daylight, and ornamental or landscape lighting requires scheduled shutoff with at least 30% power reduction capability. Emergency lighting operates under its own standard, requiring minimum 1 foot-candle illumination on exit routes, activation within 10 seconds of power loss, and 90-minute runtime from an independent power supply. Many designers treat controls as an afterthought, specifying them late in the project when coordination with electrical systems becomes chaotic. You must plan control strategies from the outset-during concept, not construction documents-to prevent conflicts with wiring, junction boxes, and equipment placement. Your layout should show sensor locations, control zones, and dimming ranges before any fixtures are ordered, and commissioning protocols must validate that sensors and dimming respond as designed before final approval. With codes and controls locked in place, the next step is identifying the specific mistakes that derail even well-intentioned designs.
Where Illuminance Calculations Go Wrong
Verify Illuminance Levels at the Working Plane
Most compliance failures stem from underestimating the illuminance levels required in specific areas and then failing to validate the actual light distribution across the space. OSHA mandates minimum illumination levels for different work areas-general office spaces need 30–50 foot-candles, detailed inspection areas require 100–200 foot-candles, and warehouse aisles typically demand 10–20 foot-candles-but many designers rely on fixture manufacturers’ nominal output without accounting for real-world factors like room reflectance, mounting height, and spacing ratios. A 4000-lumen fixture in a dark warehouse with low ceiling reflectance delivers far less usable light than the same fixture in a bright office, yet both layouts may use identical lumen counts.
You must perform illuminance mapping during design, not after installation, to confirm that every critical work area meets code minimums. Photometric analysis reveals dead zones and hot spots that generic calculations miss. Inadequate illuminance in task areas creates safety hazards and compliance violations; worse, it often goes undetected until the space is occupied and workers complain. Calculate foot-candles at the working plane using photometric data, account for room surface reflectances, and space fixtures to eliminate gaps. Many contractors assume that meeting LPD targets automatically ensures adequate illuminance, but these are separate requirements. You can be energy-efficient and still fail inspection if critical areas fall below minimum light levels.
Control Glare and Light Distribution
Glare and light distribution problems compound illuminance failures because they reduce perceived brightness and compromise visibility. The Illuminating Engineering Society sets specific limits for glare in different space types, and exceeding these limits creates visual discomfort that forces users to increase illumination levels further, wasting energy. Direct glare from unshielded fixtures, reflected glare from polished surfaces, and discomfort glare from high luminance ratios all degrade performance.
Interior office lighting must balance ambient and task lighting while controlling glare through fixture selection and aiming-recessed downlights in open-plan spaces often create uneven distribution with bright spots directly under fixtures and darker areas between them, which users perceive as inadequate even when average illuminance meets code. Dimmable LED fixtures with asymmetric distributions perform better because you can tune them to the actual space geometry, but this requires commissioning to validate performance.
Match Color Rendering to Task Requirements
Color rendering index matters far more than most designers acknowledge; a 2700K LED with CRI 70 looks dimmer and less vibrant than a 2700K LED with CRI 90 at the same lumen output, and low-CRI fixtures fail in spaces where color accuracy supports the work-retail displays, healthcare facilities, and inspection areas all demand CRI 90 or higher. Task-specific lighting needs are equally critical: general office ambient lighting differs fundamentally from task lighting at desks, and spaces with mixed uses require zoned control to serve different needs without over-illuminating.
Failing to specify color temperature and CRI in design documents leads contractors to install whatever is cheapest, which often means poor color rendering and inadequate perceived brightness that triggers complaints and rework. These specification gaps expose your design to field substitutions that undermine both performance and compliance. The next section addresses how to validate your layout before installation and generate the documentation that inspectors demand.
Validating Your Layout Before Installation
Photometric analysis is not optional-it’s the difference between a layout that passes inspection and one that fails months into the project. Most designers rely on spreadsheet calculations or fixture manufacturer data sheets, which provide nominal performance under ideal conditions that rarely exist in real buildings. The only way to confirm that your layout actually delivers the illuminance levels required by code is to map light distribution across the working plane using real photometric data. This means obtaining polar curves and zonal lumens from manufacturers, accounting for your specific room geometry, surface reflectances, and fixture spacing, then calculating foot-candles at actual work heights.
Map Illuminance Across the Working Plane
OSHA standards require 30–50 foot-candles in general office spaces and 100–200 foot-candles in detailed inspection areas, but achieving these levels depends entirely on validation before installation. A 4000-lumen fixture performs differently at 9 feet in a warehouse with dark concrete than at 10 feet in a bright office with white ceilings. Many contractors discover this gap only after installation, when rework becomes expensive and schedules slip.
You must perform illuminance mapping during design using photometric software that accepts IES files from manufacturers and calculates foot-candles at the working plane. This reveals dead zones between fixtures, hot spots directly below them, and whether your spacing ratios actually deliver uniform light across the space. Dead zones are compliance killers-a 10-foot gap between fixtures in a warehouse aisle might drop to 8 foot-candles when code demands 10 foot-candles minimum. Photometric validation catches these problems before you order fixtures, preventing field failures and inspection rejections.
Test Multiple Scenarios in Real Time
Real-time illuminance analysis during the design phase transforms compliance from guesswork into certainty. Modern lighting platforms let you adjust fixture placement, aiming angles, and dimming levels instantly while viewing updated illuminance maps, so you can optimize layouts without manual recalculation. This interactive approach saves hours compared to traditional methods where each design change requires recalculation and resubmission.
Test multiple scenarios-what happens when you space fixtures at 1.5 times mounting height versus 1.2 times? How much does switching from 3000K to 4000K affect perceived brightness? Does your daylight sensor placement actually capture the windows, or will it miss half the available daylight? These questions demand answers before construction begins, not after.
Validate Controls Through Commissioning
Commissioning protocols must validate that sensors and dimming controls respond as designed in the actual space, not just in software. Many projects skip commissioning because it seems expensive, but a single failed inspection costs far more. You need to confirm that occupancy sensors trigger reliably, that daylight harvesting maintains consistent illumination as natural light changes, and that partial-on dimming reduces energy without creating dark spots.
Submit Complete Documentation for Approval
Documentation for inspections must include photometric calculations showing foot-candle levels at the working plane, LPD calculations proving you meet energy code limits, control strategy diagrams showing sensor placement and dimming zones, and commissioning records confirming that installed systems perform as designed. Inspectors want to see your work-vague submissions trigger requests for clarification that delay approvals.
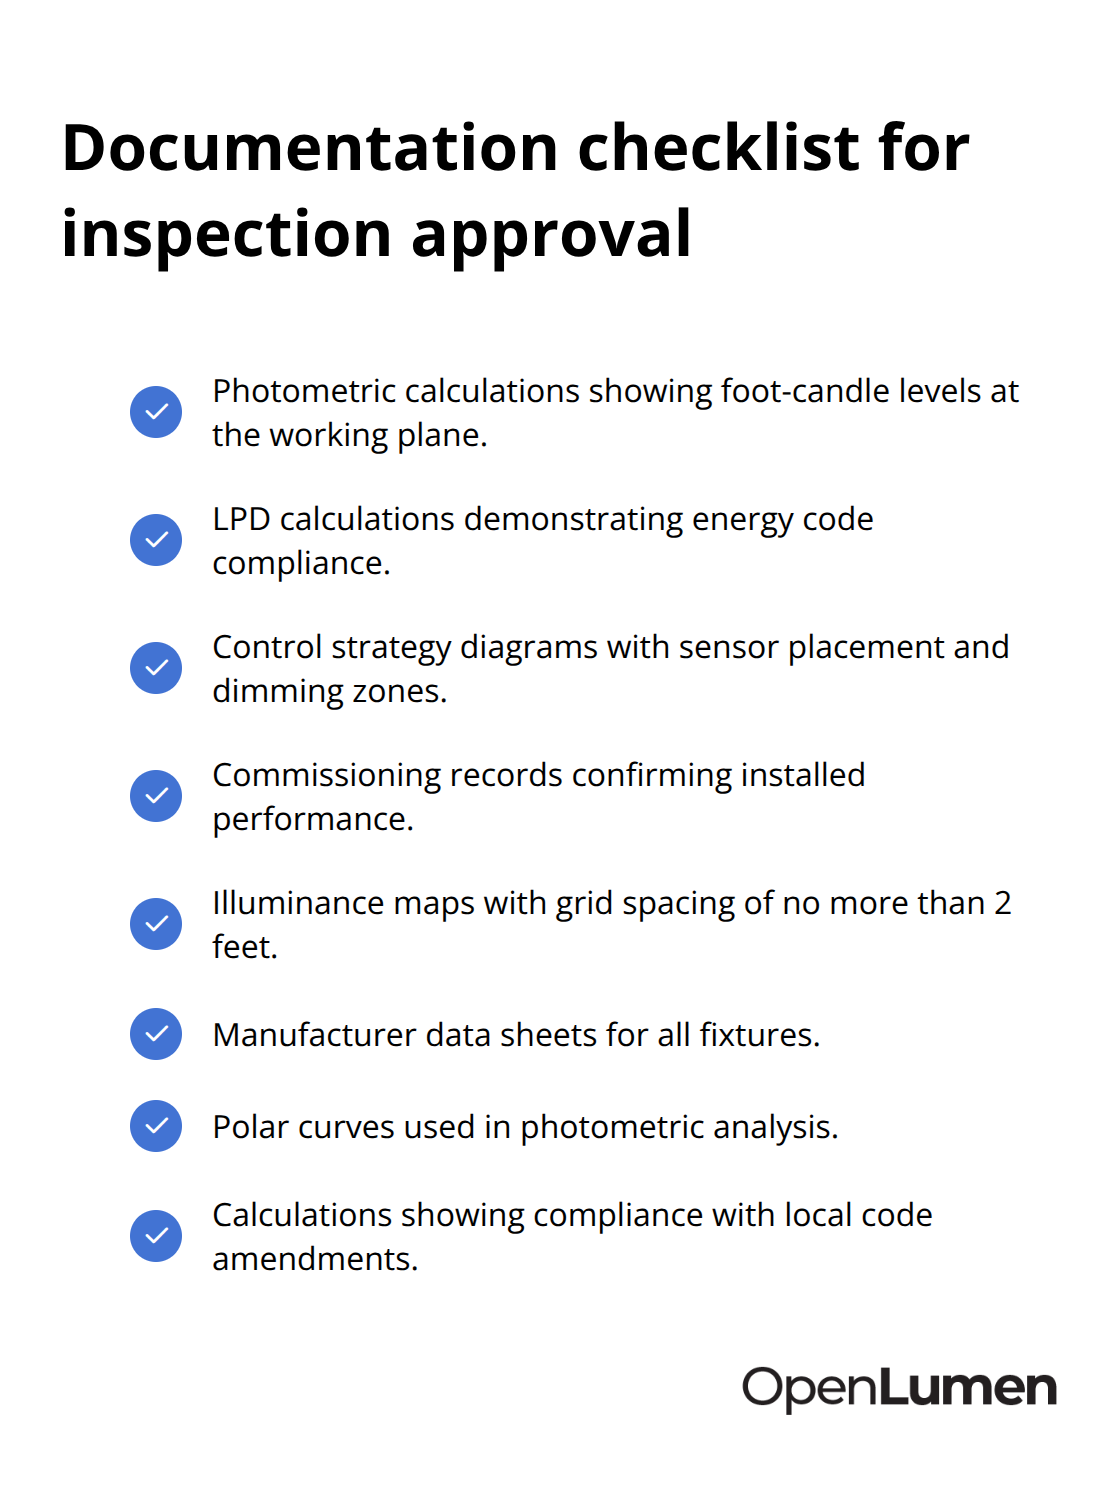
Provide illuminance maps with grid spacing of no more than 2 feet, showing that every critical area meets minimum levels. Include manufacturer data sheets for all fixtures, polar curves for photometric analysis, and calculations that demonstrate compliance with local code amendments, not just national standards. Many jurisdictions require this documentation before final sign-off, and submitting incomplete packages guarantees delays.
Final Thoughts
Lighting layouts for compliance succeed when you treat codes as design constraints from day one, not obstacles to work around later. The standards exist-ASHRAE 90.1, IECC, OSHA, ADA, NEC-and they govern your project regardless of whether you acknowledge them upfront. Calculating your lighting power budget, planning control strategies before fixture selection, validating illuminance levels through photometric analysis, and commissioning controls in the actual space are not optional steps.
Map illuminance across the working plane during design, not after installation, and test multiple scenarios in real time to optimize fixture placement and dimming ranges. Submit complete documentation showing foot-candle levels, LPD compliance, control diagrams, and commissioning records before construction begins. This approach eliminates the costly rework that derails projects when inspectors reject incomplete submissions or installed systems fail to meet code.
Start your next project by calculating LPD first, planning controls second, and validating performance third. OpenLumen lets you create photometric layouts, run real-time illuminance analysis, and generate professional reports without expensive software or steep learning curves. This sequence prevents the mistakes that plague rushed designs and keeps schedules on track while transforming lighting layouts for compliance from uncertainty into confidence.
The information provided is for general educational purposes only and should not be considered professional engineering or lighting design advice. Always verify project requirements, local codes, and specifications with qualified professionals before making final decisions.


