Bad lighting layouts waste money and frustrate users. Fixtures placed without calculation, wrong spacing, and ignored material reflectance create dark spots, glare, and inflated energy bills.
At OpenLumen, we’ve seen how efficient lighting layouts transform spaces. The right design delivers proper coverage, cuts costs, and gets client approval faster.
Where Lighting Layouts Go Wrong
Foot-Candle Calculations Are Non-Negotiable
Most lighting designers skip foot-candle calculations entirely, relying instead on rules of thumb or guesswork. This creates spaces that fall short of their actual requirements. A parking lot needs 40 footcandles for safety, but without calculation, you might install fixtures delivering only 20 or 25 footcandles, leaving dark zones and liability gaps. Offices require 30–50 footcandles for comfortable task work, yet many layouts assume uniform brightness works everywhere. The reality is that different spaces demand different light levels. A storage closet needs far less than a detailed assembly area. When you skip this step, you either overspend on excess fixtures or underspend and create unusable spaces.
Spacing Ratios Prevent Dark Spots and Wasted Energy
Fixture placement without spacing ratios compounds the problem. The practical rule is to space fixtures roughly 1 to 1.5 times the mounting height for even coverage. A 10-foot ceiling calls for fixtures spaced approximately 10–15 feet apart. Ignore this, and you get clusters of bright spots with dark gaps between them. We’ve observed layouts where fixtures were placed randomly around a room, leaving one corner adequately lit while another stayed dim. This wastes energy on some fixtures while failing to meet illuminance in others. Worse, poor spacing often triggers requests for additional fixtures, inflating project costs and energy consumption unnecessarily.
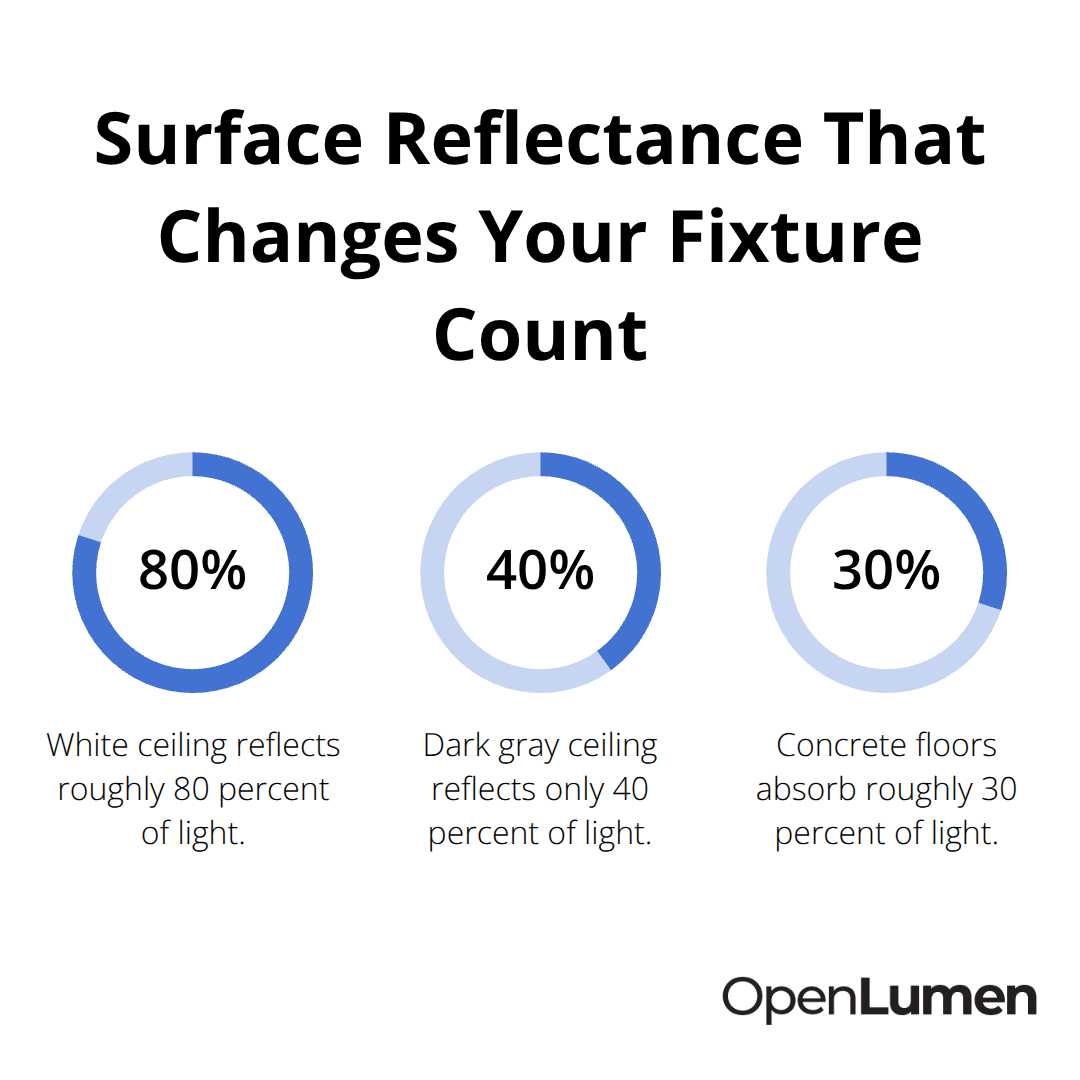
Surface Materials Directly Impact Your Fixture Count
Reflectance-how much light walls, ceilings, and floors bounce back-directly affects how many fixtures you actually need. A white ceiling reflects roughly 80 percent of light, while a dark gray ceiling reflects only 40 percent. That difference is massive. A space with dark surfaces demands more fixtures or higher-wattage units to hit the same foot-candle target as one with bright surfaces.
Many designers ignore this entirely, treating all rooms as if they have identical reflective properties. You end up with either insufficient light in dark spaces or wasted energy in bright ones.
Paint color and material finish also shift the equation. Matte surfaces scatter light more evenly but absorb more than glossy finishes. Concrete floors absorb roughly 30 percent of light, while polished concrete reflects significantly more. If your layout assumes average reflectance but the actual space has dark brick walls and a concrete floor, your carefully calculated fixture count won’t deliver the required footcandles.
Measure Reflectance Before Finalizing Placement
The fix is straightforward: measure or estimate actual surface reflectance values before finalizing placement. This single step eliminates most layout failures and ensures your calculations match reality. Once you account for foot-candles, spacing ratios, and reflectance, you’re ready to move from theory into practical design methods that speed up your workflow and deliver results clients approve immediately.
Building a Layout That Actually Works
Start with foot-candle targets, not guesses. Different spaces demand different light levels, and the calculation is straightforward: multiply your room area in square feet by the required foot-candles for that space type. A 200-square-foot office needing 40 footcandles requires 8,000 lumens total. A parking lot of the same size needs the same calculation but often demands higher foot-candles for safety-typically 40 footcandles minimum. Most designers assume one foot-candle value works everywhere. It doesn’t. Assembly areas need 50 footcandles or more for detail work. Hallways need 10–20. Storage areas need 5–10.

Once you know your target, you can determine how many fixtures you need and at what wattage. This removes the guesswork and prevents both under-lighting and wasteful over-specification.
Spacing and Mounting Height Create Even Coverage
Spacing and mounting height work together to create even coverage. The 1 to 1.5 times mounting height rule is your baseline: a 10-foot ceiling means you space fixtures 10–15 feet apart. But this only works if you account for beam angle and distribution pattern. A fixture with a narrow beam angle concentrates light in a tight circle, requiring tighter spacing. A wide beam angle spreads light across a larger area, allowing you to space fixtures farther apart. The distribution type matters too-standard Type III distribution works well for most rectangular rooms, while Type II suits narrower spaces. Test your spacing on paper or in software before installation. Uneven spacing creates the dark spots and bright zones that force you to add more fixtures later, killing your efficiency gains.
Surface Reflectance Determines Fixture Workload
Surface reflectance determines how hard your fixtures have to work. A white ceiling at 80 percent reflectance bounces light efficiently throughout the room. A dark gray ceiling at 40 percent reflectance absorbs half that light. If your layout assumes white surfaces but the actual space has dark brick walls and a concrete floor, your fixture count will fall short. Measure reflectance values before finalizing placement-most materials fall into standard ranges you can look up. White drywall and paint: 80–85 percent. Light gray: 60–70 percent. Dark gray or concrete: 30–40 percent. Polished concrete reflects better than rough concrete. Once you input actual reflectance into your photometric calculations, your fixture count aligns with reality, not wishful thinking.
Room Geometry Demands Adjustments
Rectangular rooms are easy-your spacing calculations apply directly. But L-shaped rooms, high ceilings, and alcoves demand adjustments. A 20-foot ceiling in a warehouse requires either wider-beam fixtures or tighter spacing to maintain footcandles on the floor. Sloped ceilings force you to adjust mounting heights and angles per section. Rooms with deep alcoves or shelving create shadows that simple spacing ratios won’t solve. Photometric simulation before you order anything solves these challenges. Real-time illuminance mapping shows you exactly where light lands and where gaps exist, letting you adjust fixture count and placement instantly. This step eliminates costly surprises and rework. It also accelerates client approval because they see the actual light distribution, not a theoretical estimate. Once you validate your layout through simulation, you move into the tools and methods that speed up the entire design process.
Speed Up Design With Real-Time Photometric Verification
Photometric software eliminates the guesswork from layout validation. Instead of hoping your spacing calculations and reflectance adjustments work in practice, you simulate the actual light distribution before ordering a single fixture. This shift from theory to verified simulation cuts design time dramatically and prevents costly installation mistakes.
Simulate Before You Install
A free, browser-based lighting platform lets you load your room dimensions, input surface reflectance values, and test fixture placements in real time. You see illuminance maps that show exactly where light lands and where gaps exist. A 200-square-foot office layout that took hours to calculate manually now validates in minutes. You adjust fixture count, spacing, or wattage instantly and watch the illuminance values update on screen. This immediate feedback means you catch dark spots before installation, not after.
Access Luminaire Data Instantly
The Photometric Hub provides instant access to polar charts, BUG ratings, and zonal lumens for any luminaire in the library, so you compare performance across products without hunting through separate spec sheets. This centralized approach to luminaire metrics saves hours of research and eliminates the need to cross-reference multiple manufacturer documents. You make fixture selections based on verified performance data rather than marketing claims.
Reduce Revision Cycles
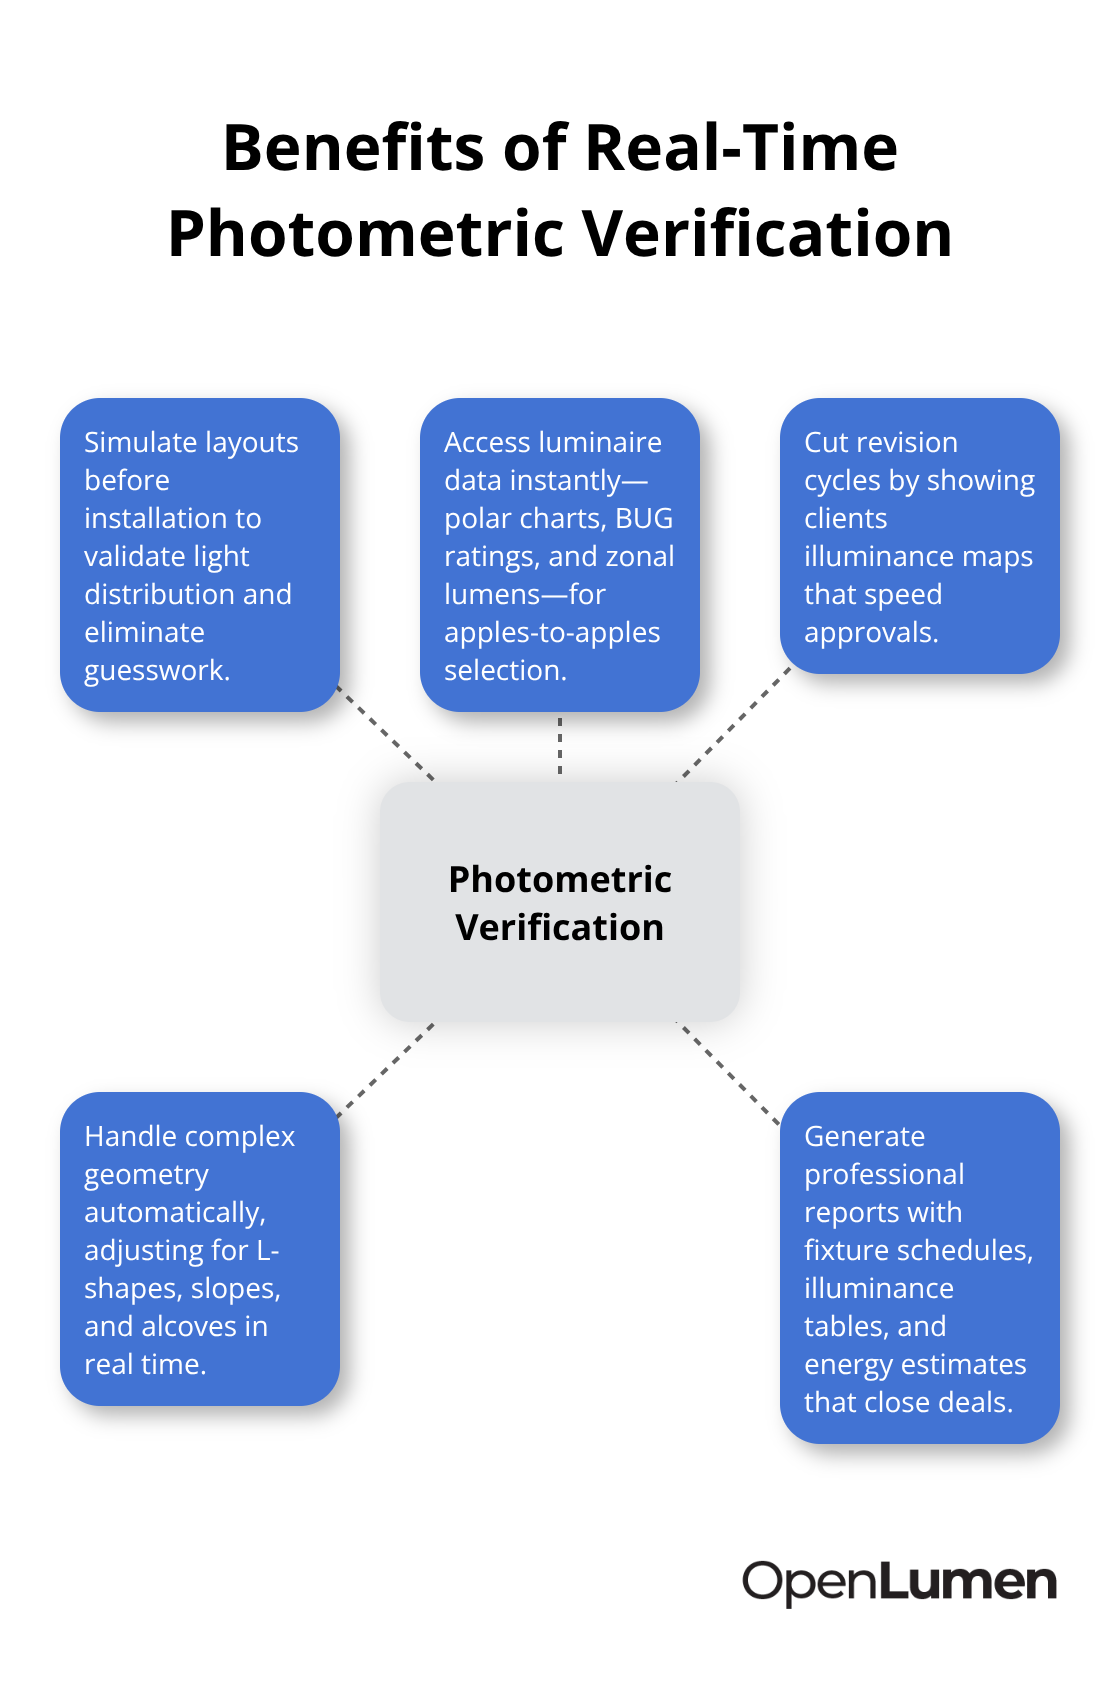
Real contractors report that photometric verification cuts their revision cycles from three or four rounds to one. Clients see illuminance maps showing exactly how bright each zone will be, eliminating vague descriptions and approval delays. A distributor selling a 5,000-square-foot warehouse retrofit can now generate a complete photometric layout with coverage verification in under an hour instead of days.
Handle Complex Geometry Automatically
The software handles room geometry automatically, so L-shaped spaces, sloped ceilings, and alcoves adjust calculations without manual workarounds. You no longer need to break complex rooms into sections and recalculate spacing for each one. The system accounts for these variations in real time, delivering accurate illuminance predictions across the entire space.
Generate Professional Reports That Close Deals
Once your layout passes verification, automated report generation creates professional PDFs showing fixture schedules, illuminance tables, and light distribution graphics. These reports speak directly to facility managers and procurement teams who need proof that the design meets code and performance targets. The reports include energy consumption estimates and maintenance schedules, giving clients the full picture of operating costs. This transparency accelerates approvals and eliminates post-installation disputes over whether the layout actually delivers what was promised.
Final Thoughts
Efficient lighting layouts stop being a guessing game once you apply foot-candle calculations, spacing ratios, and reflectance measurements to your design process. These three fundamentals eliminate dark spots, prevent wasted energy, and deliver spaces that actually work. The fix is systematic: calculate your illuminance needs based on space type, position fixtures using proven spacing rules, and account for how your actual surfaces reflect light.
The real efficiency gain comes from validating your layout before installation. Photometric simulation shows you exactly where light lands and where gaps exist, eliminating surprises on site. Clients see illuminance maps that prove your design meets their requirements, which accelerates approvals and removes post-installation disputes. Professional reports generated from your verified layout provide facility managers with energy consumption estimates and maintenance schedules, giving them confidence in the long-term operating costs.
Treat photometric verification as a standard step in every project, not an optional extra. OpenLumen provides a free, browser-based platform where you load room dimensions, test fixture placements in real time, and generate professional reports without expensive software or complex training. Your team designs faster, clients approve quicker, and projects install right the first time.
The information provided is for general educational purposes only and should not be considered professional engineering or lighting design advice. Always verify project requirements, local codes, and specifications with qualified professionals before making final decisions.


